在前面的文章中我们讲到了 render 函数的最后,也就是 updateContainer 函数里面调用 scheduleUpdateOnFiber 函数调度更新任务。那么这一篇文章我们将来详细讲解一下 React 的 Schedule 调度的流程。
根据 React18 的源码,我们可以分为两个阶段:
-
render 阶段:这个阶段由 scheduler 调度程序和 Reconciler 协调流程两个模块构成,主要内容是更新任务的调度以及 FiberTree【虚拟 DOM 树】的构建。
-
commit 阶段:根据创建完成的 FiberTree,构建出真实的 DOM 内容渲染到页面。
react 应用的每次加载或更新流程,都会执行这两个阶段的程序,所以理解每个阶段的执行逻辑,对于我们理解 react 源码至关重要。
scheduleUpdateOnFiber()
接着前面的内容,我们这个时候进入到了 scheduleUpdateOnFiber 函数里面来了:

在该函数实现中,我删除了一些非必要的代码,只留下了一些核心代码:
// src/react/packages/react-reconciler/src/ReactFiberWorkLoop.old.js
export function scheduleUpdateOnFiber(
  root: FiberRoot,
  fiber: Fiber, // fiber表示被更新的节点
  lane: Lane, // lane表示update优先级
  eventTime: number,
) {
  // 检查是否存在循环更新,例如在类组件中 render 方法中调用了 setState 这种死循环的情况
  checkForNestedUpdates();

  // 将root设置为待更新的状态
  markRootUpdated(root, lane, eventTime);

  // 如果是正在进行中(更新操作中)的 root
  if (
    // 正在渲染,且root和正在work的root相同
    (executionContext & RenderContext) !== NoLanes &&
    root === workInProgressRoot
  ) {
    warnAboutRenderPhaseUpdatesInDEV(fiber);
    // 车道合并
    workInProgressRootRenderPhaseUpdatedLanes = mergeLanes(
      workInProgressRootRenderPhaseUpdatedLanes,
      lane,
    );
  } else {
    if (enableUpdaterTracking) {
      if (isDevToolsPresent) {
        // 添加一个 fiber Map
        addFiberToLanesMap(root, fiber, lane);
      }
    }

    warnIfUpdatesNotWrappedWithActDEV(fiber);

    // 设置过渡回调
    if (enableTransitionTracing) {
      const transition = ReactCurrentBatchConfig.transition;
      if (transition !== null) {
        if (transition.startTime === -1) {
          transition.startTime = now();
        }

        addTransitionToLanesMap(root, transition, lane);
      }
    }

    if (root === workInProgressRoot) {
      // 在渲染过程中接收到一个更新,在根节点上标记一个交错更新,
      if (deferRenderPhaseUpdateToNextBatch || (executionContext & RenderContext) === NoContext) {
        workInProgressRootInterleavedUpdatedLanes = mergeLanes(
          workInProgressRootInterleavedUpdatedLanes,
          lane,
        );
      }
      if (workInProgressRootExitStatus === RootSuspendedWithDelay) {
        // 由于有高优先级的新的 update,将当前的更新标记为暂停,并切换到新的 update
        markRootSuspended(root, workInProgressRootRenderLanes);
      }
    }

    // 调度一个渲染任务
    ensureRootIsScheduled(root, eventTime);
  }
}
在上面的代码中,我们根据函数名可以知道 scheduleUpdateOnFiber 方法主要是触发一个在 Fiber 节点上的调度更新任务,这个函数在很多地方被调用,比如组件状态变化 setState、useState 就会调用此函数触发一次调度任务,执行一次完整的更新流程。
它首先调用 checkForNestedUpdates() 函数来检查是否存在循环更新的情况,例如在类组件的 render 方法中调用 setState 导致的死循环。
接着调用 markRootUpdated(root, lane, eventTime); 函数将 Root 标记为待更新状态,表示该根节点需要进行更新。
markRootUpdated()
首先我们来查看一下 markRootUpdated 方法:
export function markRootUpdated(root: FiberRoot, updateLane: Lane, eventTime: number) {
  root.pendingLanes |= updateLane; // 更新等级
  // 如果 updateLane 不是 IdleLane(表示更新不是空闲状态)
  // 则将 root.suspendedLanes 和 root.pingedLanes 设置为 NoLanes。
  // 这意味着当前没有挂起或被触发的更新。
  if (updateLane !== IdleLane) {
    root.suspendedLanes = NoLanes;
    root.pingedLanes = NoLanes;
  }

  const eventTimes = root.eventTimes;
  const index = laneToIndex(updateLane);
  eventTimes[index] = eventTime;
}
这段代码的主要功能是标记 FiberRoot 对象的更新状态。它记录了更新的优先级和事件发生时间,并在非空闲状态下清除 Suspense 和被触发的更新。它的具体步骤包括:
-
更新 pendingLanes 以记录新的更新优先级。
-
如果更新优先级不是空闲则清除 Suspense 和被触发的更新,
-
更新事件时间数组,记录新的事件发生时间。
目前 FiberRoot 的状态如下图所示:

总的来说,markRootUpdated 方法的主要作用就是第一行代码的内容;将本次更新的优先级 updateLane,附加到 root 应用根节点上的 pendingLanes 属性,标记其有正在等待更新的任务。此时挂载的优先级将会后在后续被转换为调度优先级,方便调度程序的使用。
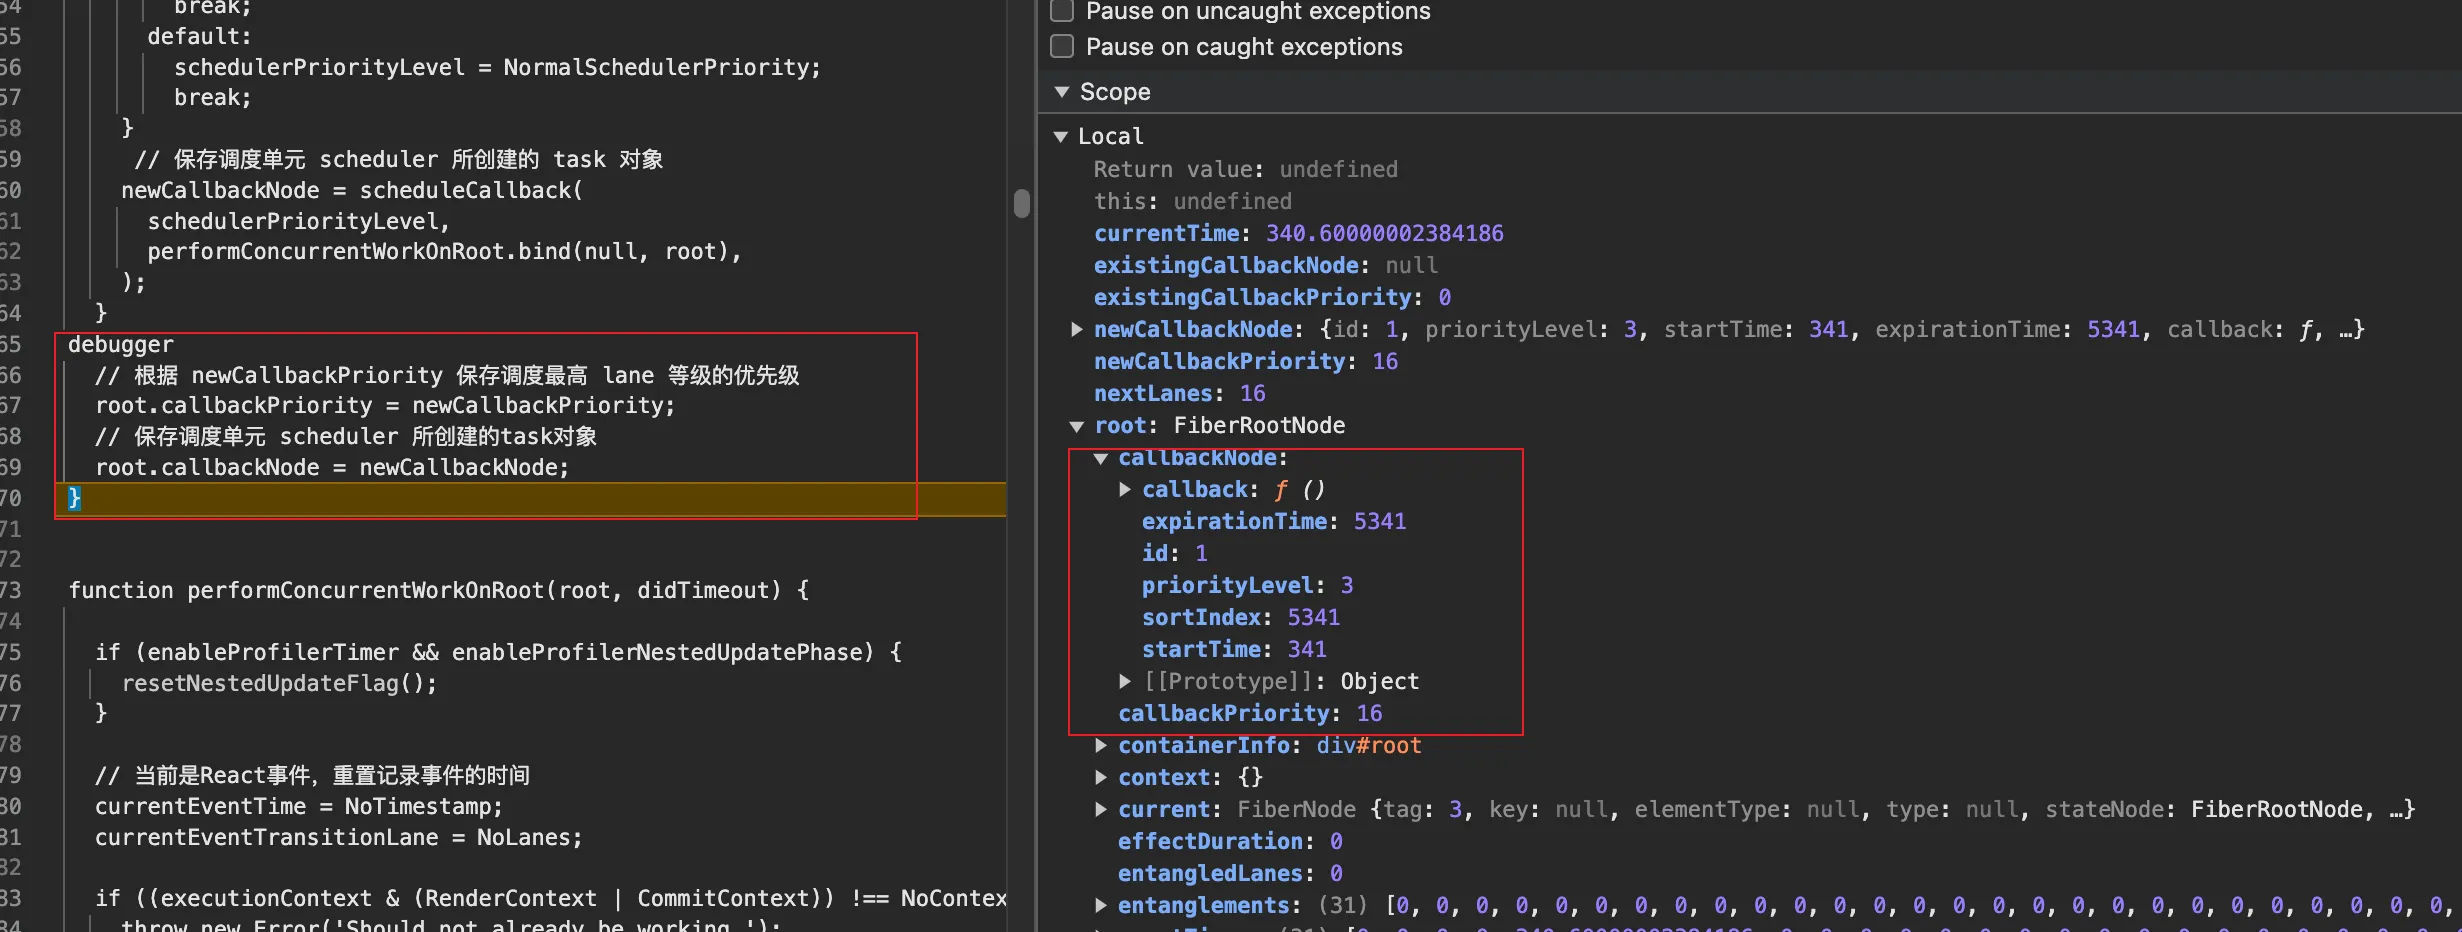
ensureRootIsScheduled()
ensureRootIsScheduled 是更新的必经之路,负责不同优先级任务的调度,并产生调度优先级
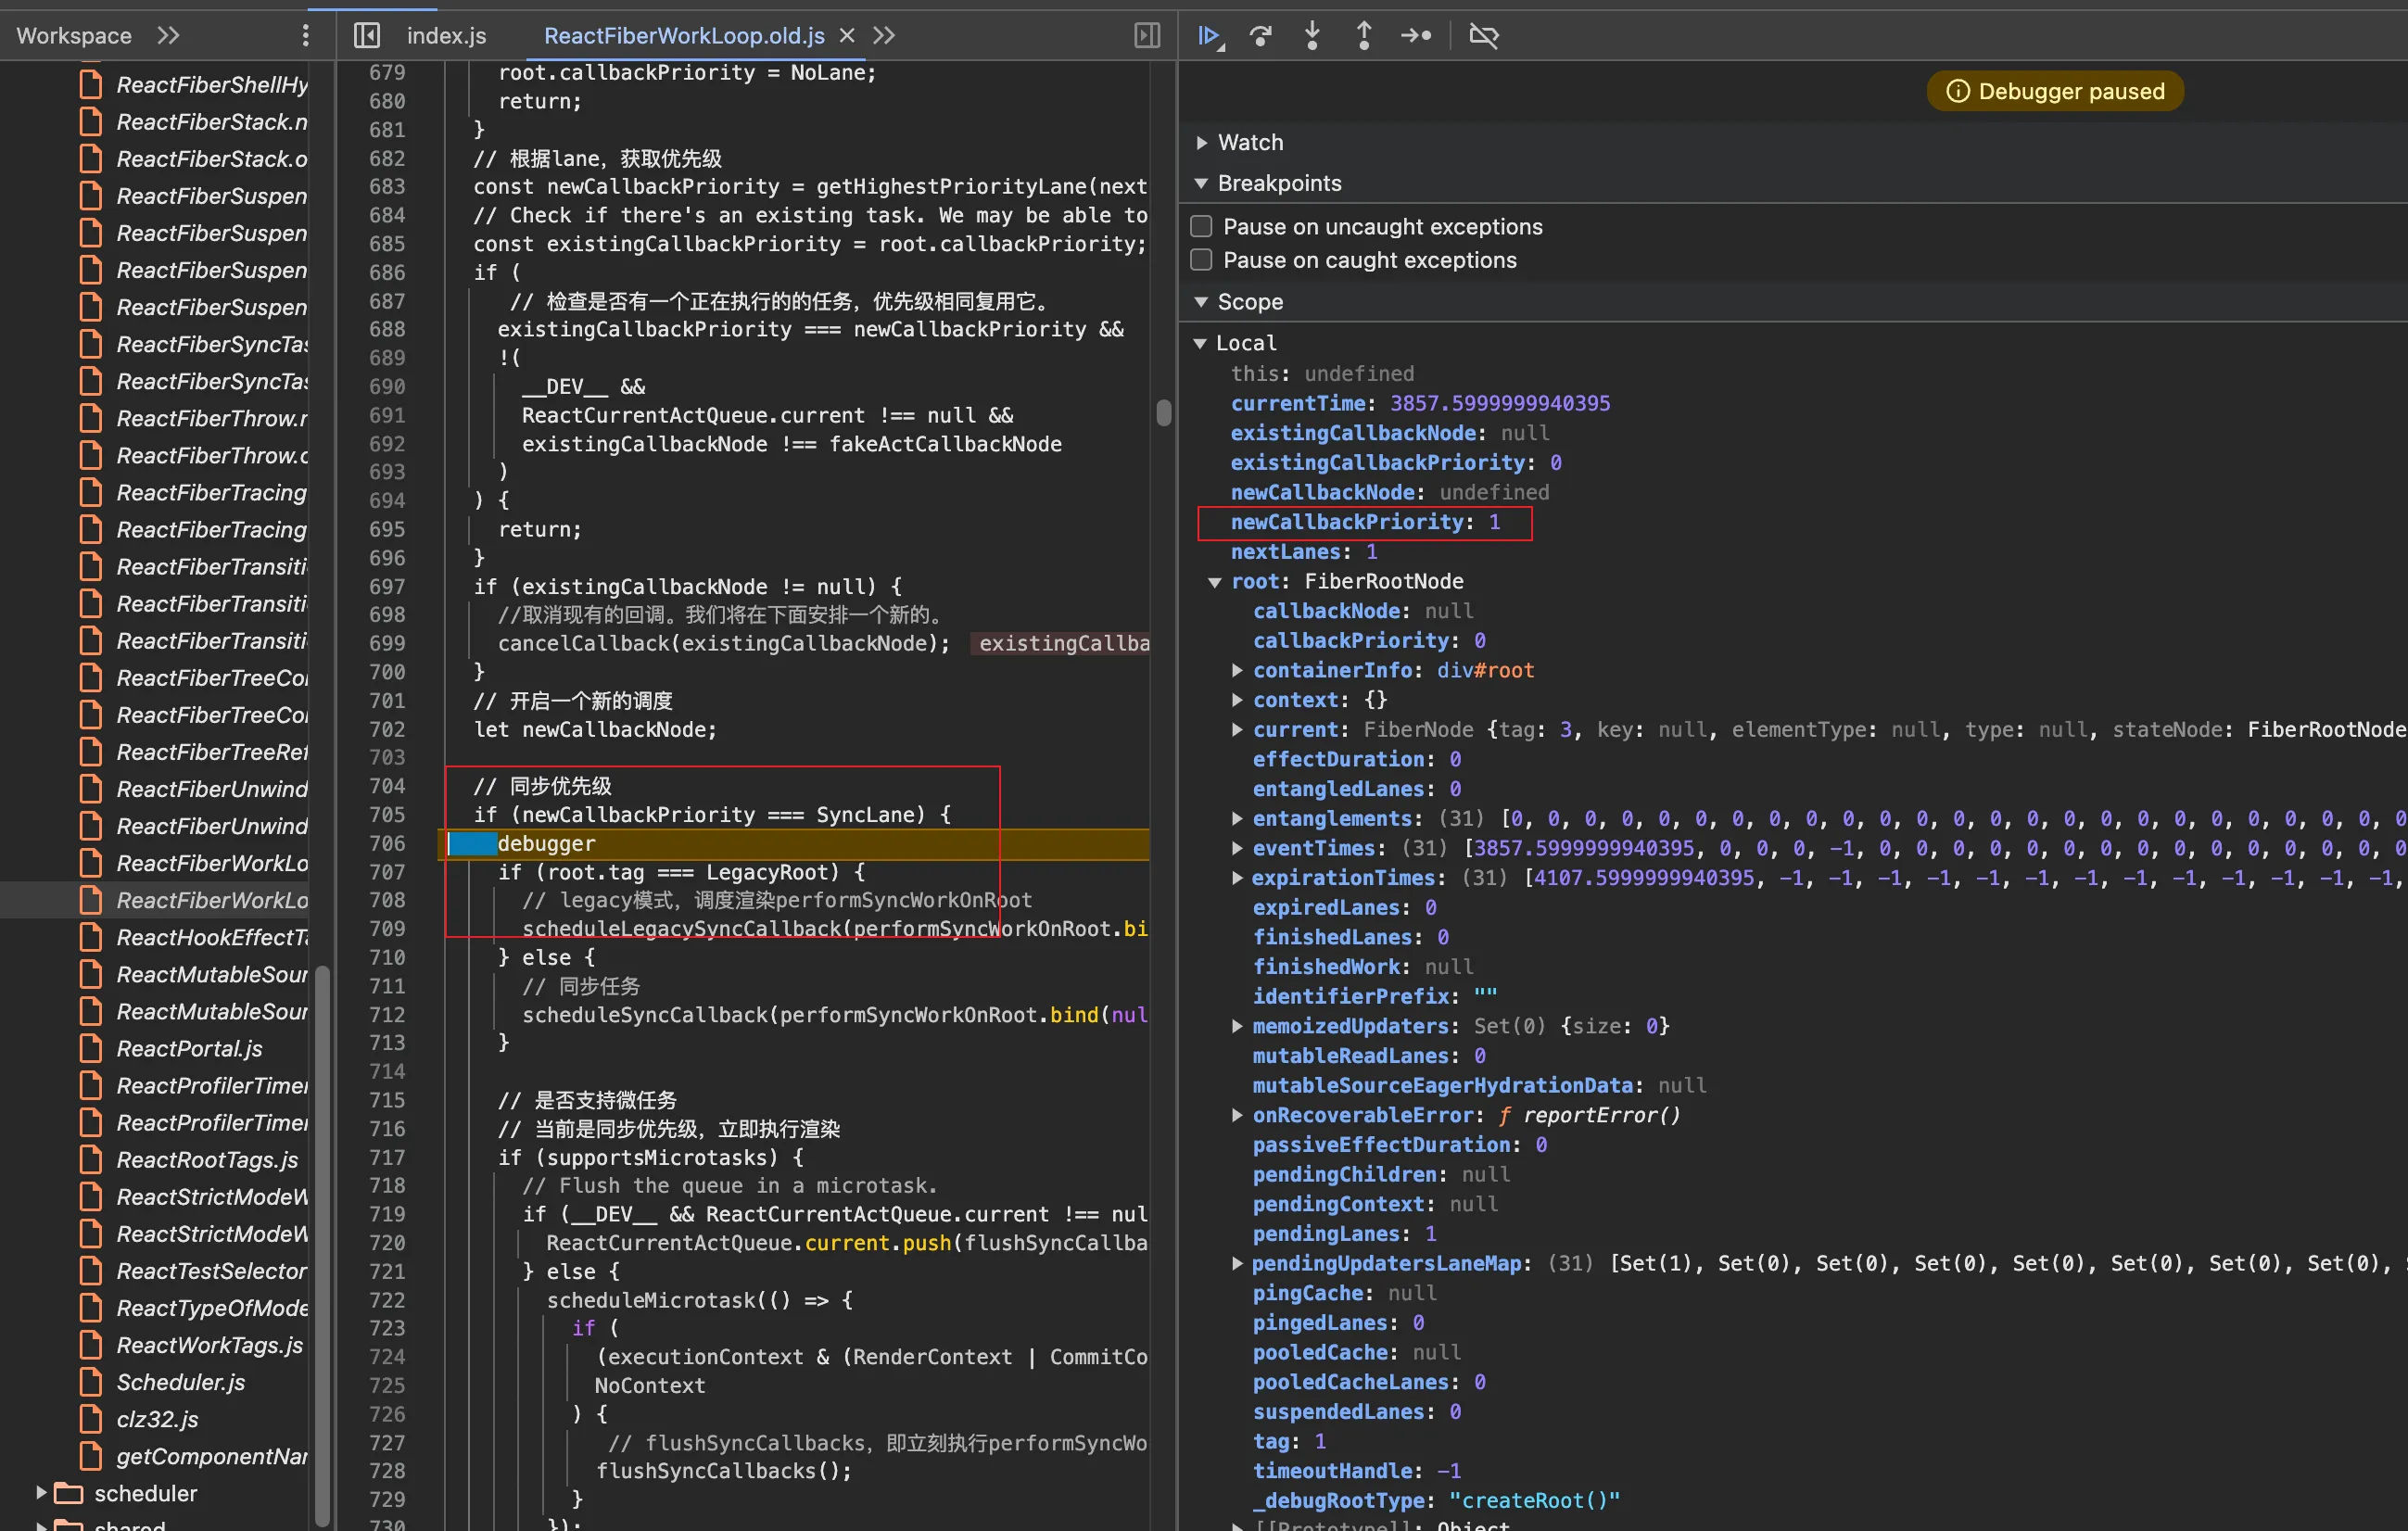
function ensureRootIsScheduled(root: FiberRoot, currentTime: number) {
// 保存调度单元,scheduler所创建的task对象,与并发模式的调度有关。
const existingCallbackNode = root.callbackNode;
// 是否有 lane 饿死,标记为过期。
markStarvedLanesAsExpired(root, currentTime);
/**
* 获取最高 lane 等级的新任务的 lane 值
* 同时设置全局变量 return_highestLanePriority
* return_highestLanePriority 对应的是 最高 lane 等级的优先级
* return_highestLanePriority 可以通过 returnNextLanesPriority 函数返回
*/
const nextLanes = getNextLanes(
root,
root === workInProgressRoot ? workInProgressRootRenderLanes : NoLanes,
);
// 无任务
if (nextLanes === NoLanes) {
// Special case: There's nothing to work on.
if (existingCallbackNode !== null) {
cancelCallback(existingCallbackNode);
}
root.callbackNode = null;
root.callbackPriority = NoLane;
return;
}
// 根据lane,获取优先级
const newCallbackPriority = getHighestPriorityLane(nextLanes);
// Check if there's an existing task. We may be able to reuse it.
const existingCallbackPriority = root.callbackPriority;
if (
// 检查是否有一个正在执行的的任务,优先级相同复用它。
existingCallbackPriority === newCallbackPriority &&
!(
__DEV__ &&
ReactCurrentActQueue.current !== null &&
existingCallbackNode !== fakeActCallbackNode
)
) {
return;
}
if (existingCallbackNode != null) {
//取消现有的回调。我们将在下面安排一个新的。
cancelCallback(existingCallbackNode);
}
// 开启一个新的调度
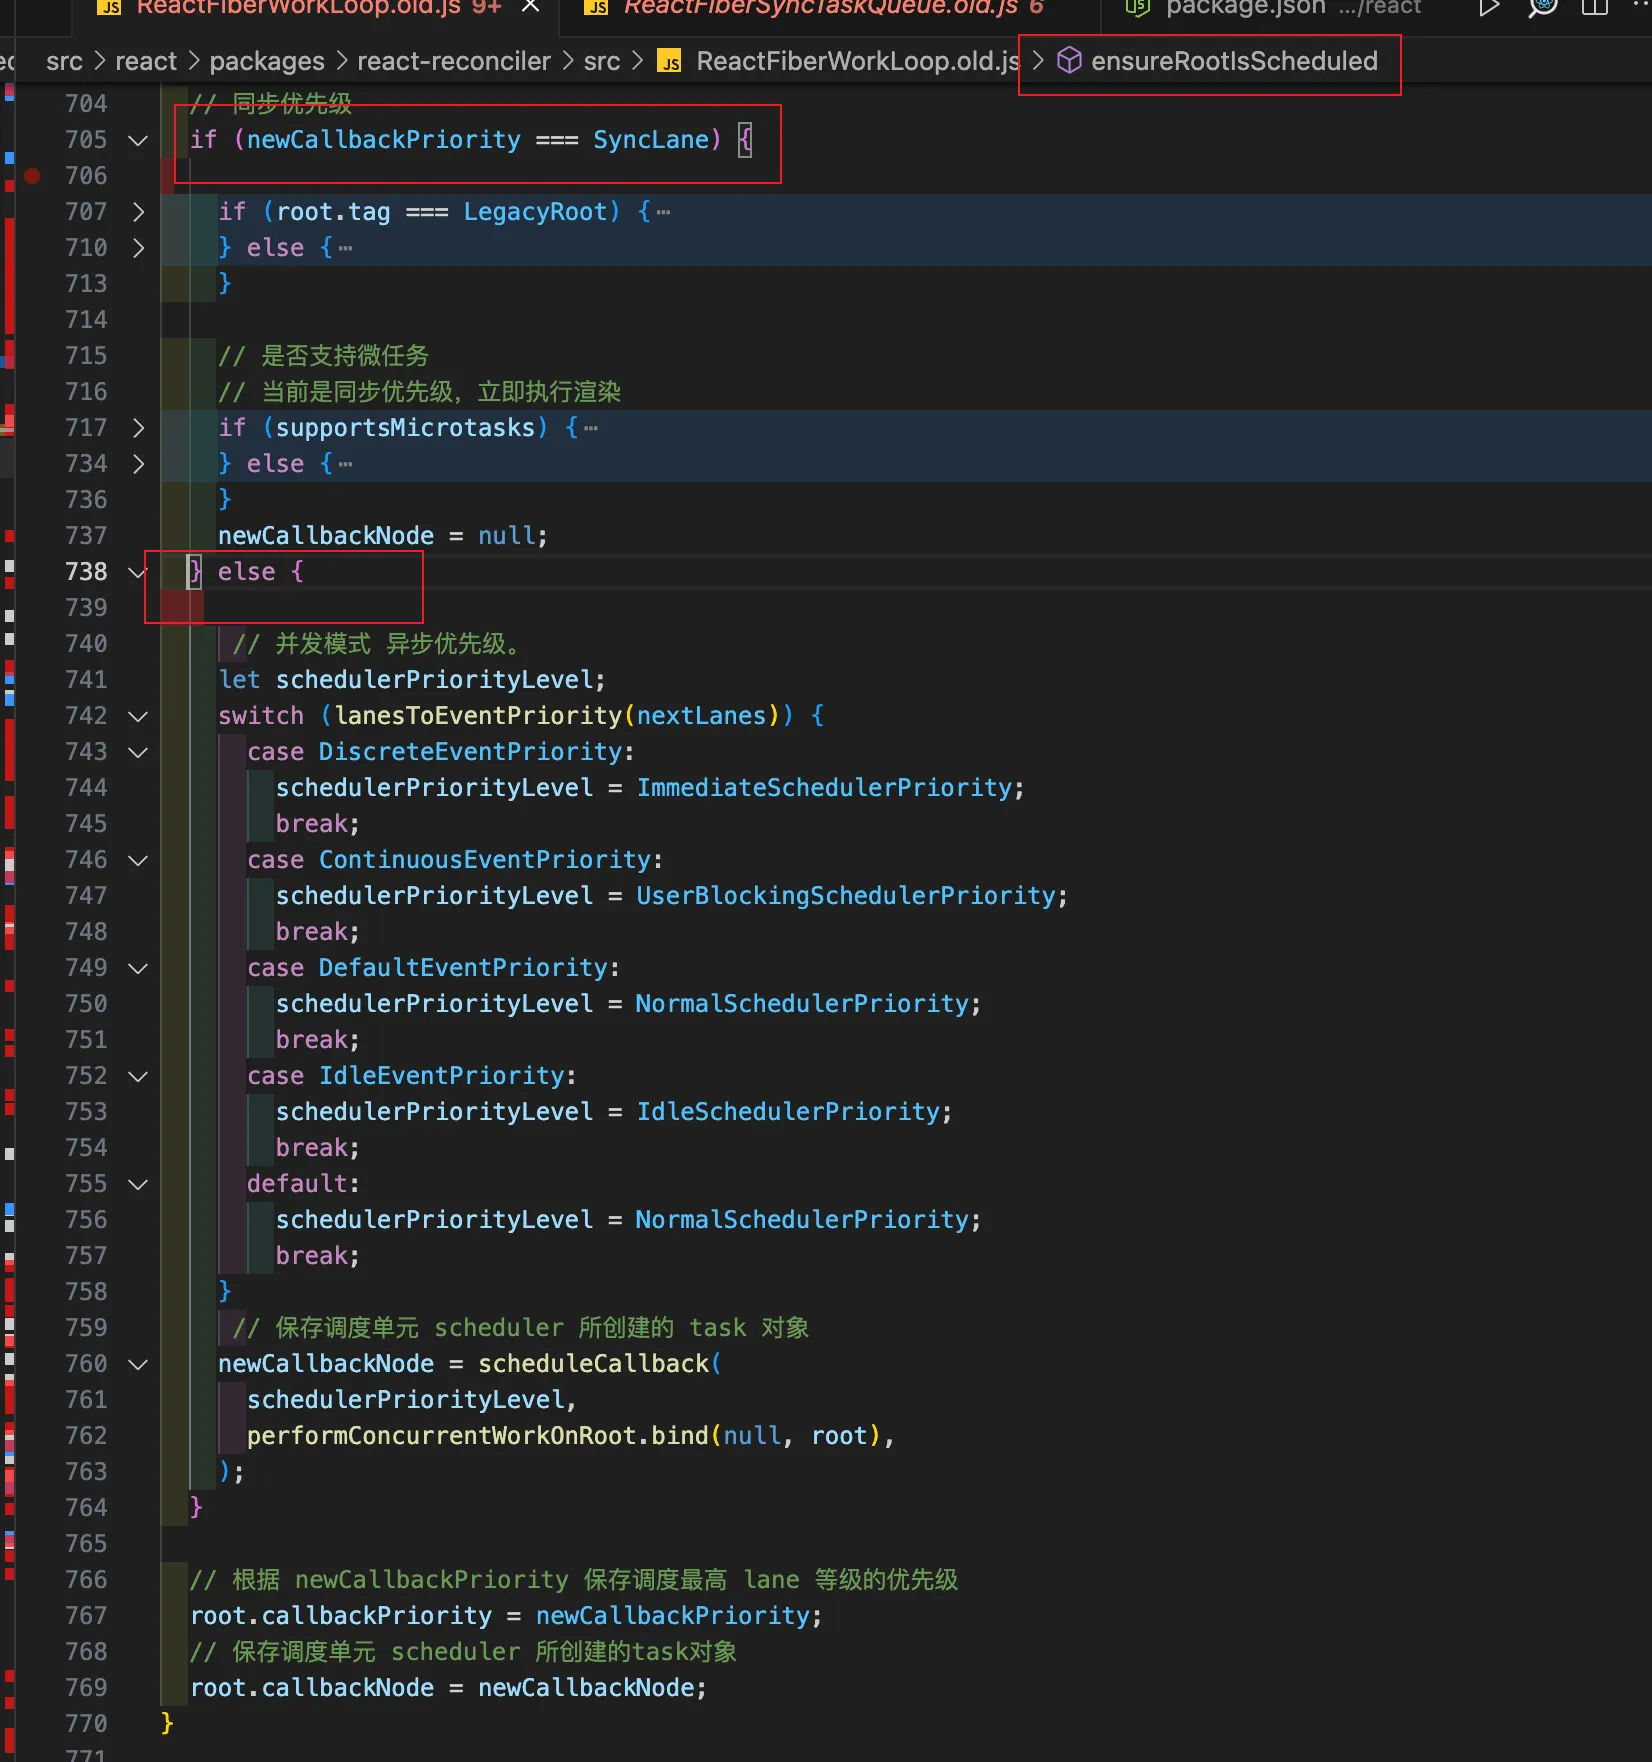
let newCallbackNode;
// 同步优先级
if (newCallbackPriority === SyncLane) {
if (root.tag === LegacyRoot) {
// legacy模式,调度渲染performSyncWorkOnRoot
scheduleLegacySyncCallback(performSyncWorkOnRoot.bind(null, root));
} else {
// 同步任务
scheduleSyncCallback(performSyncWorkOnRoot.bind(null, root));
}
// 是否支持微任务
// 当前是同步优先级,立即执行渲染
if (supportsMicrotasks) {
if (__DEV__ && ReactCurrentActQueue.current !== null) {
ReactCurrentActQueue.current.push(flushSyncCallbacks);
} else {
scheduleMicrotask(() => {
if ((executionContext & (RenderContext | CommitContext)) === NoContext) {
// flushSyncCallbacks,即立刻执行performSyncWorkOnRoot
flushSyncCallbacks();
}
});
}
} else {
scheduleCallback(ImmediateSchedulerPriority, flushSyncCallbacks);
}
newCallbackNode = null;
} else {
// 并发模式 异步优先级。
let schedulerPriorityLevel;
// lanes转换成事件优先级,匹配符合的优先级,然后赋值对应的scheduler的优先级
switch (lanesToEventPriority(nextLanes)) {
case DiscreteEventPriority:
schedulerPriorityLevel = ImmediateSchedulerPriority;
break;
case ContinuousEventPriority:
schedulerPriorityLevel = UserBlockingSchedulerPriority;
break;
case DefaultEventPriority:
schedulerPriorityLevel = NormalSchedulerPriority;
break;
case IdleEventPriority:
schedulerPriorityLevel = IdleSchedulerPriority;
break;
default:
schedulerPriorityLevel = NormalSchedulerPriority;
break;
}
// 保存调度单元 scheduler 所创建的 task 对象
newCallbackNode = scheduleCallback(
schedulerPriorityLevel,
performConcurrentWorkOnRoot.bind(null, root),
);
}
// 根据 newCallbackPriority 保存调度最高 lane 等级的优先级
root.callbackPriority = newCallbackPriority;
// 保存调度单元 scheduler 所创建的task对象
root.callbackNode = newCallbackNode;
}在上面的这些代码中,它首先会保存现有的调度单元:
const existingCallbackNode = root.callbackNode;保存当前已经调度的任务,以便后续进行取消或者复用,后续执行 markStarvedLanesAsExpired(root, currentTime); 来检查是否有饿死的 lane 并将其标记为过期。
通过 getHighestPriorityLane 方法来获取新任务的最高优先级:
const newCallbackPriority = getHighestPriorityLane(nextLanes);并检查是否可以复用现有任务,如果已有任务的优先级与新任务相同,则复用现有任务。复用任务的目的是为了优化性能和资源使用。如果已有的任务优先级足够高,可以处理新的更新,那么就没有必要取消现有任务并重新调度一个新的任务。这样可以减少不必要的开销,提升调度系统的效率。
最后根据任务的优先级,调度同步或者异步任务:
-
同步任务优先级 SyncLane:调度同步回调 scheduleLegacySyncCallback 或 scheduleSyncCallback。使用微任务立即执行 flushSyncCallbacks。
-
异步任务优先级: 根据事件优先级 lanesToEventPriority 设置调度优先级。调度并发任务 scheduleCallback。
在最后保存新任务的优先级和调度单元。
这下我们可以知道 ensureRootIsScheduled 的过程:
-
取出下一个最高优先级的任务
-
跟当前任务优先级比较
-
优先级相同则复用,直接 return
-
优先级不同,则取消当前任务,scheduleCallback 生成一个新的任务,并更新 root。
在代码的后面我们可以看到有一段 switch 的处理,这一段代码通过将 nextLanes 转换为事件优先级,再根据事件优先级设置相应的调度优先级,可以确保 React 能够根据不同的任务类型(如用户交互、网络请求、动画等)合理分配资源,优化性能。
同步任务和异步任务
这下子我们借助该函数可以来好好区分同步任务和异步任务了。
在 React 中,同步任务优先级(SyncLane)通常用于需要立即处理的任务。这些任务通常与用户体验密切相关,要求在用户操作后立即得到反馈。具体来说,以下几类任务通常属于同步任务优先级:
-
用户交互相关的任务:
- 点击事件:用户点击按钮、链接等,需要立即响应并更新界面。
- 表单提交:用户提交表单,需要立即处理表单数据并更新界面。
- 输入框输入:用户在输入框中输入文字,需要立即更新显示内容,如在输入法中处理输入字符。
-
高优先级状态更新:
- 强制更新:通过 ReactDOM.flushSync 强制同步更新。
- 批量更新:如在事件处理函数中对多个状态进行批量更新,需要立即应用所有更新,确保界面保持一致性。
-
生命周期方法 componentDidMount、componentDidUpdate、componentWillUnmount 等方法中触发的更新:这些生命周期方法需要在特定时刻立即执行,以确保组件的正确行为。
例如我们添加一个点击事件,如下代码所示:
import React, { useState } from 'react';

const App = () => {
  const [clicked, setClicked] = useState(false);

  function handleClick() {
    setClicked(true); // 立即更新状态
  }
  return <button onClick={handleClick}>{clicked ? 'Clicked!' : 'Click me'}</button>;
};

export default App;
当我们点击的时候,它是会进入到同步优先级这个判断中的:
在组件的生命周期方法中进行同步更新也是一样的效果:
import React, { Component } from 'react';

class LifecycleComponent extends Component {
  constructor(props) {
    super(props);
    this.state = { count: 0 };
  }

  componentDidMount() {
    this.setState({ count: this.state.count + 1 }); // 同步更新
  }

  componentDidUpdate(prevProps, prevState) {
    if (prevState.count !== this.state.count) {
      // 同步更新
      console.log('Count updated:', this.state.count);
    }
  }

  render() {
    return <div>Count: {this.state.count}</div>;
  }
}

export default LifecycleComponent;
同步任务优先级意味着任务会在当前帧内立即执行,不会被调度到下一帧。
异步任务(Asynchronous Tasks)通常是那些不需要立即执行,可以延迟到未来某个时间点执行的任务。所以它有如下特点:
-
非阻塞执行:异步任务不会阻塞主线程,可以在后台处理,确保主界面的响应速度。
-
延迟执行:这些任务可以根据优先级和调度策略被延迟到未来某个时间点执行。
-
并发处理:React 使用并发模式(Concurrent Mode)来调度和执行异步任务,以提高性能和用户体验。
在 React 中,异步任务的调度通过调度器(Scheduler)来管理。调度器会根据任务的优先级和当前的系统状态来决定任务何时执行。
useEffect Hook 是一个常见的用于处理异步任务的工具,例如数据获取和订阅操作。
import React, { useEffect, useState } from 'react';

function FetchData() {
  const [data, setData] = useState(null);

  useEffect(() => {
    async function fetchData() {
      const response = await fetch('https://api.example.com/data');
      const result = await response.json();
      setData(result);
    }

    fetchData();
  }, []);
  if (!data) {
    return <div>Loading...</div>;
  }

  return (
    <div>
      <h1>Data:</h1>
      <pre>{JSON.stringify(data, null, 2)}</pre>
    </div>
  );
}

export default FetchData;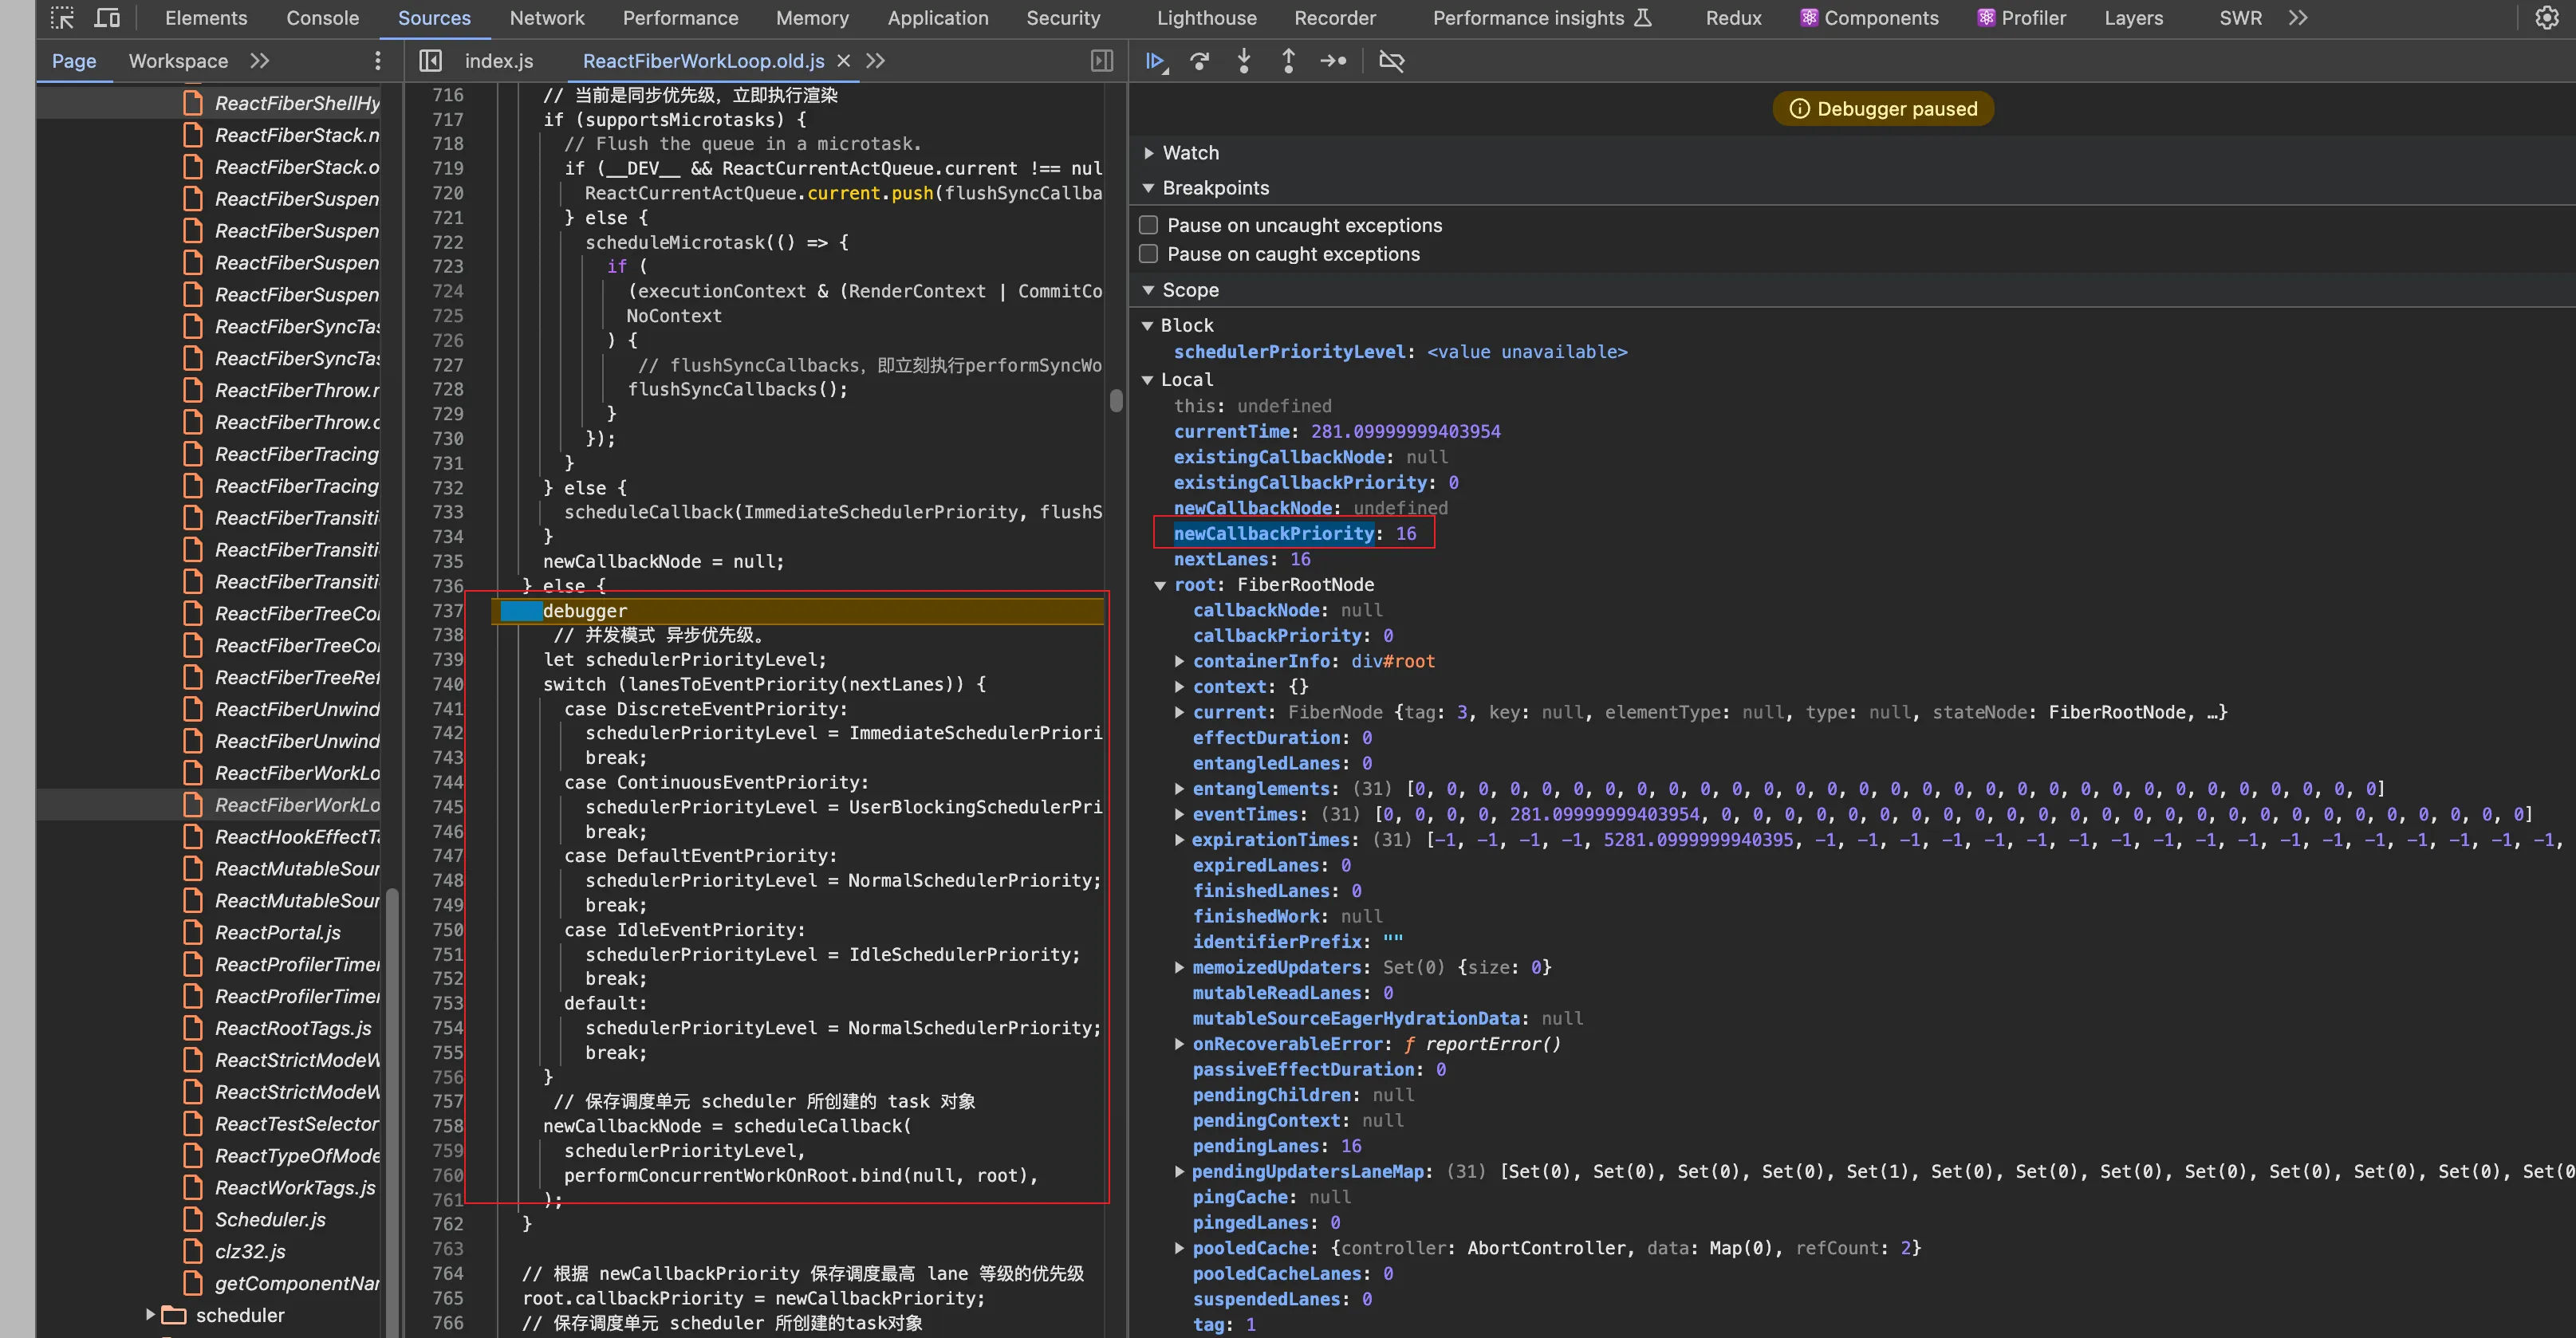
异步任务在 React 中的调度机制主要依赖于调度器 scheduler,它根据任务的优先级和系统的空闲时间来决定何时执行任务。下面是一些关键的优先级类型:
-
ImmediateSchedulerPriority:立即执行的最高优先级。
-
UserBlockingSchedulerPriority:用户阻塞优先级,稍低于立即执行。
-
NormalSchedulerPriority:正常优先级。
-
IdleSchedulerPriority:空闲优先级,只有在系统空闲时才执行。
通过异步调度机制,可以确保任务在不阻塞主线程的情况下被处理,从而优化性能和用户体验。
同步任务处理函数 scheduleSyncCallback
如果是同步任务的话,它会执行同步任务调度,也就是调用这个函数:
scheduleSyncCallback(performSyncWorkOnRoot.bind(null, root));该方法如下代码所示:
export function scheduleSyncCallback(callback: SchedulerCallback) {
  if (syncQueue === null) {
    syncQueue = [callback];
  } else {
    syncQueue.push(callback);
  }
}
scheduleSyncCallback 函数的主要作用是将同步回调函数添加到内部队列 syncQueue 中。这些回调函数会在下一次事件循环(tick)中,或在调用 flushSyncCallbackQueue 时被执行。
-
如果 syncQueue 是空的(即 null),表示这是第一次添加回调,初始化队列并包含当前回调。
-
如果 syncQueue 已经存在,直接将新的回调推入队列。
这里的 callback 方法就是上面传入的 performSyncWorkOnRoot,它就是专门执行同步更新任务的方法。
performSyncWorkOnRoot
performSyncWorkOnRoot 该方法如下代码实现:
function performSyncWorkOnRoot(root) {

  if (enableProfilerTimer && enableProfilerNestedUpdatePhase) {
    syncNestedUpdateFlag();
  }

  if ((executionContext & (RenderContext | CommitContext)) !== NoContext) {
    throw new Error('Should not already be working.');
  }

  flushPassiveEffects();

  let lanes = getNextLanes(root, NoLanes);
  if (!includesSomeLane(lanes, SyncLane)) {

    ensureRootIsScheduled(root, now());
    return null;
  }
  let exitStatus = renderRootSync(root, lanes);
  if (root.tag !== LegacyRoot && exitStatus === RootErrored) {
    const errorRetryLanes = getLanesToRetrySynchronouslyOnError(root);
    if (errorRetryLanes !== NoLanes) {
      lanes = errorRetryLanes;
      exitStatus = recoverFromConcurrentError(root, errorRetryLanes);
    }
  }

  if (exitStatus === RootFatalErrored) {
    const fatalError = workInProgressRootFatalError;
    prepareFreshStack(root, NoLanes);
    markRootSuspended(root, lanes);
    ensureRootIsScheduled(root, now());
    throw fatalError;
  }

  if (exitStatus === RootDidNotComplete) {
    throw new Error('Root did not complete. This is a bug in React.');
  }

  const finishedWork: Fiber = (root.current.alternate: any);
  root.finishedWork = finishedWork;
  root.finishedLanes = lanes;
  commitRoot(
    root,
    workInProgressRootRecoverableErrors,
    workInProgressTransitions,
  );

  ensureRootIsScheduled(root, now());

  return null;
}
performSyncWorkOnRoot 函数的主要作用是在同步模式下执行 React 根节点的渲染工作。它处理渲染过程中的各种情况,包括刷新被动效果、处理渲染错误和致命错误、commit 渲染结果,并确保根节点被正确调度
performSyncWorkOnRoot 方法主要逻辑就以下几点:
-
调用 renderRootSync 方法创建 FiberTree。
-
然后将创建完成的 FiberTree 挂载到 root 应用根节点上。
-
最后调用 commitRoot 方法,进入 commit 阶段的内容执行,将虚拟 DOM 树转换为真实的 DOM 结构渲染到页面。
flushSyncCallbacks
我们要继续查看同步任务的第二点处理逻辑:
scheduleMicrotask(() => {
  if ((executionContext & (RenderContext | CommitContext)) === NoContext) {
    flushSyncCallbacks();
  }
});
这段代码主要做的事情是将同步任务的执行放在微任务队列中,在一次同步事件中可能多次修改 state,如果每次修改都发起调度任务,会带来不必要的性能开销。将这些修改合并到一个微任务中,可以减少调度次数。微任务的执行优先级高于宏任务,这意味着 state 更新可以在下一次渲染之前立即处理完毕,从而提高渲染效率和响应速度。
在 React 的同步任务处理逻辑中,syncQueue 用来存储所有需要同步执行的回调任务。当某个同步事件触发状态更新时,更新操作会被推入 syncQueue,然后通过 scheduleMicrotask 方法将 flushSyncCallbacks 放入微任务队列,以确保在当前同步任务完成后立即执行这些回调。
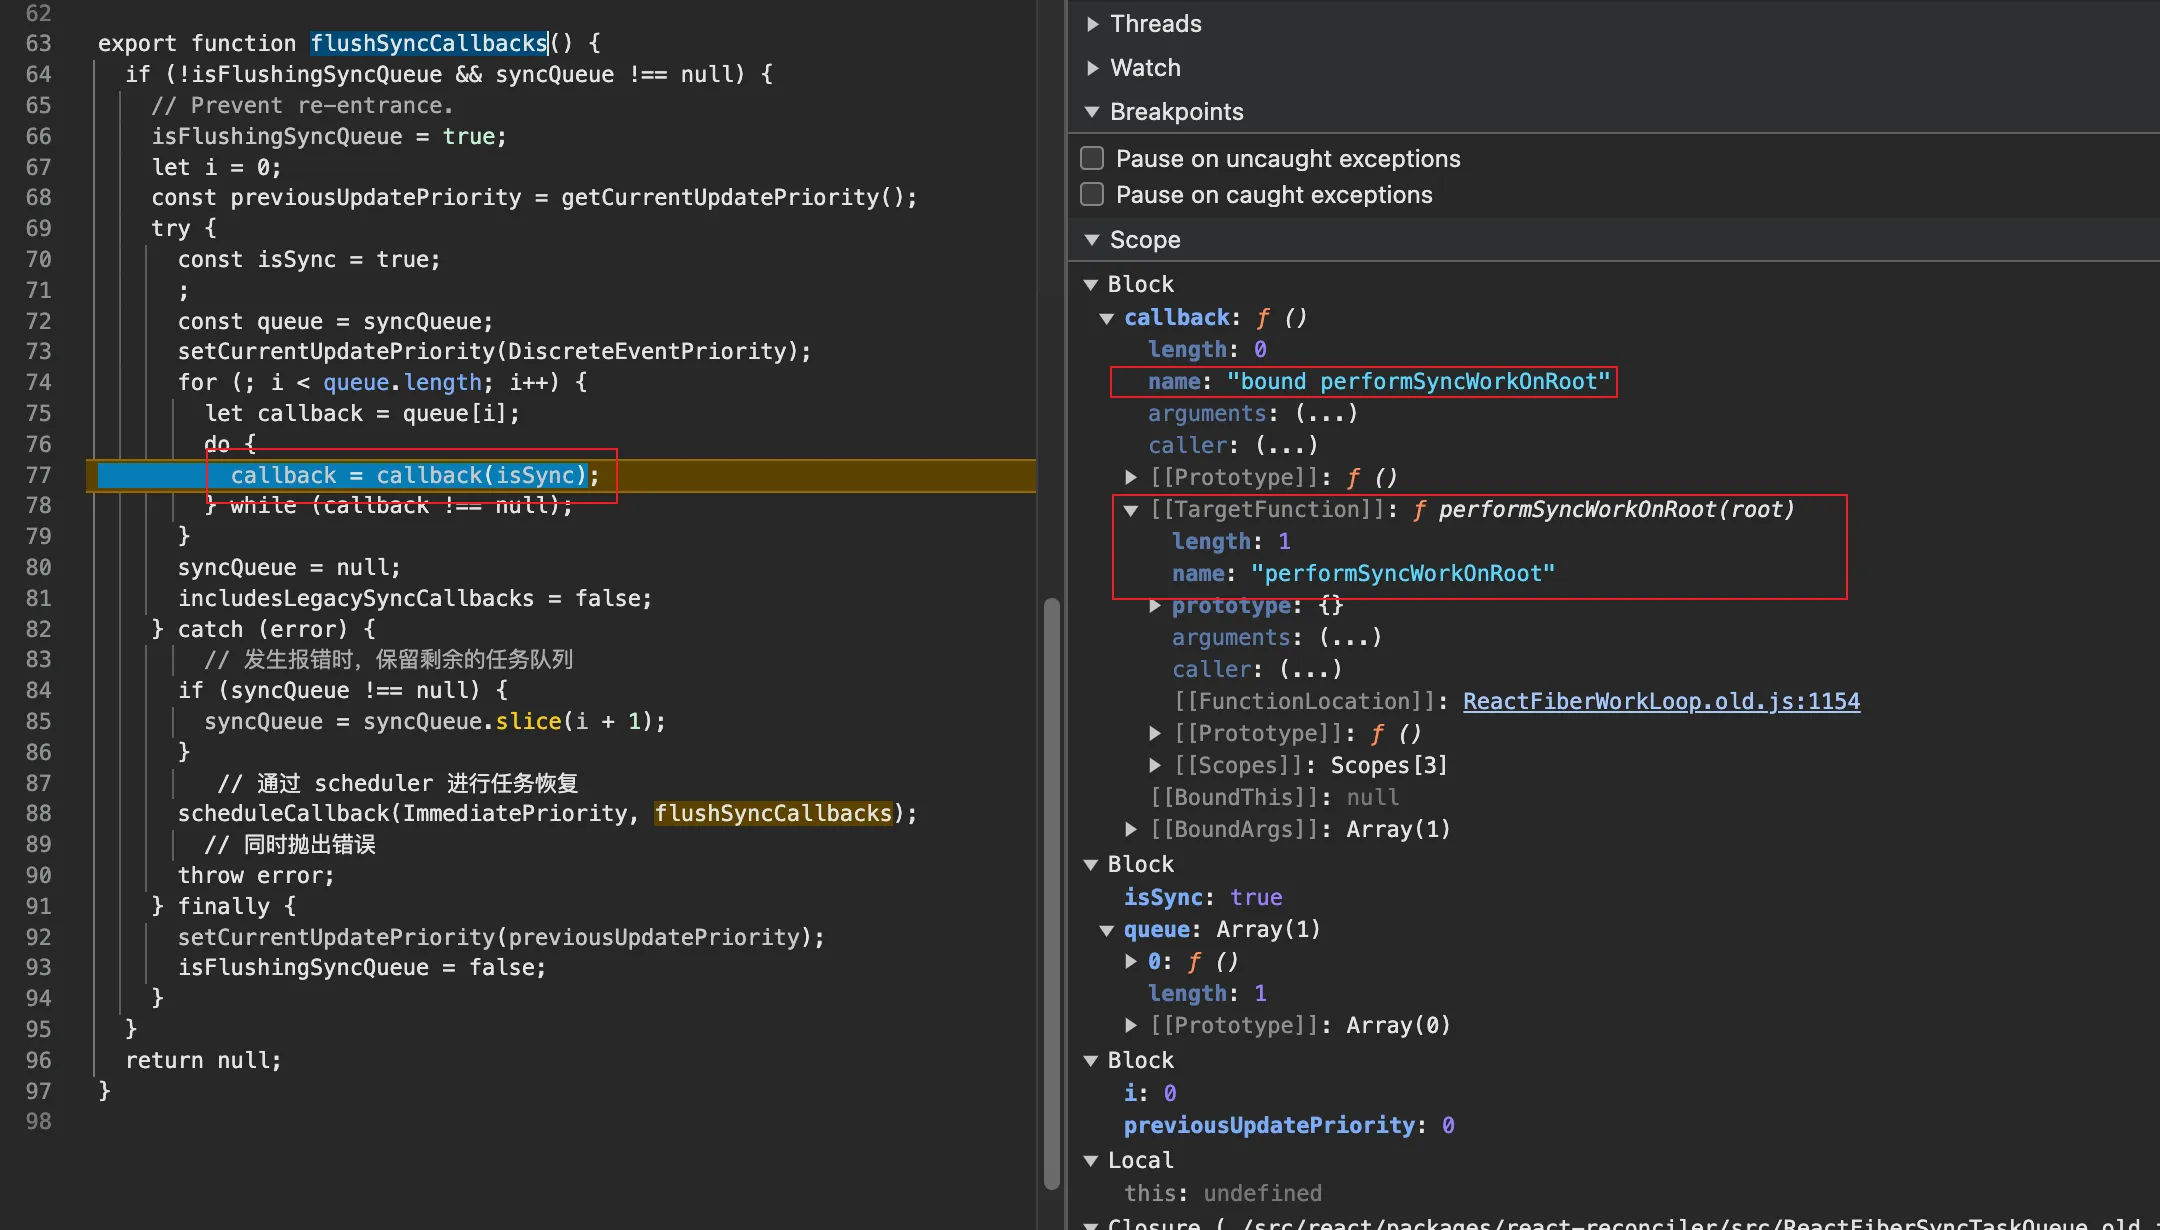
export function flushSyncCallbacks() {
  if (!isFlushingSyncQueue && syncQueue !== null) {
    // Prevent re-entrance.
    isFlushingSyncQueue = true;
    let i = 0;
    const previousUpdatePriority = getCurrentUpdatePriority();
    try {
      const isSync = true;
      const queue = syncQueue;
      setCurrentUpdatePriority(DiscreteEventPriority);
      for (; i < queue.length; i++) {
        let callback = queue[i];
        do {
          callback = callback(isSync);
        } while (callback !== null);
      }
      syncQueue = null;
      includesLegacySyncCallbacks = false;
    } catch (error) {
      // 发生报错时,保留剩余的任务队列
      if (syncQueue !== null) {
        syncQueue = syncQueue.slice(i + 1);
      }
      // 通过 scheduler 进行任务恢复
      scheduleCallback(ImmediatePriority, flushSyncCallbacks);
      // 同时抛出错误
      throw error;
    } finally {
      setCurrentUpdatePriority(previousUpdatePriority);
      isFlushingSyncQueue = false;
    }
  }
  return null;
}
从上面的源码我们可以知道 flushSyncCallbacks 方法的核心就是循环同步队列,取出队列之中的 callback 回调,调用 callback 回调函数,执行同步更新任务。
总的来说,React 中的同步更新任务执行逻辑相对简单。同步任务默认会添加到微任务队列中执行,这意味着即使是同步任务,也不一定会立即执行,而是在当前同步任务完成后尽快执行。具体流程如下:同步任务被直接推入 syncQueue,在适当时机(通常在当前任务完成后)通过将 flushSyncCallbacks 放入微任务队列中,确保这些同步任务在当前事件循环结束后立即执行,不会被其他宏任务打断。尽管是同步任务,但由于被放入微任务队列,因此不会立即执行,而是在当前同步任务完成后才执行。这种机制可以避免在同一同步事件中多次修改 state 时触发多次渲染和调度,从而提高性能。
异步更新
如果新的回调优先级 newCallbackPriority 不等于 SyncLane,则代表当前为异步任务,需要进行异步并发更新。
在前面的内容我们也已经提到过 React 和 Scheduler 都是相对独立的,它们自己内部都有自己的一套优先级机制,所以当 React 产生的事件需要被 Scheduler 调度时,需要将 React 的事件优先级转换为 Scheduler 的调度优先级。
newCallbackNode = scheduleCallback(schedulerPriorityLevel,performConcurrentWorkOnRoot.bind(null, root))这里 newCallbackNode 就是本次的 task 任务,scheduleCallback 函数是从调度器 scheduler 中导出的方法,意味着从这个时候我们开始进入了真正的 Schedule 调度阶段了。
这里 newCallbackNode 就是本次的 task 任务,
在这里会将本次的回调任务存储到 root 应用根节点的 callbackNode 属性上,同步代码即基本执行完成,callback 则会在新生成的宏任务中异步执行。
scheduleCallback
scheduleCallback 对应的是 Scheduler.js 中的 unstable_scheduleCallback,首先我们先来了解一下该文件中定义的一些全局变量:
// src/react/packages/scheduler/src/forks/Scheduler.js

// 立即执行
var IMMEDIATE_PRIORITY_TIMEOUT = -1;
// 常用超时时间
var USER_BLOCKING_PRIORITY_TIMEOUT = 250;
// 普通优先级
var NORMAL_PRIORITY_TIMEOUT = 5000;
// 低优先级
var LOW_PRIORITY_TIMEOUT = 10000;
// 永不超时
var IDLE_PRIORITY_TIMEOUT = maxSigned31BitInt;

// 调度中的队列
var taskQueue = [];
// 未过期队列
var timerQueue = [];
首先我们来看看一下前面的五个变量,这些常量定义了不同优先级的超时时间:
-
IMMEDIATE_PRIORITY_TIMEOUT = -1:立即执行,表示这个任务应该立即执行,没有延迟。 -
USER_BLOCKING_PRIORITY_TIMEOUT = 250:用户阻塞优先级,通常用于需要快速响应用户操作的任务,超时时间为 250 毫秒。 -
NORMAL_PRIORITY_TIMEOUT = 5000:普通优先级任务,超时时间为 5000 毫秒。 -
LOW_PRIORITY_TIMEOUT = 10000:低优先级任务,超时时间为 10000 毫秒。 -
IDLE_PRIORITY_TIMEOUT = maxSigned31BitInt:空闲优先级任务,表示永不超时,只有在没有其他任务时才执行。
Scheduler 中有两个任务队列:timerQueue 和 taskQueue。 timerQueue 和 taskQueue 都是最小堆的数据结构。
-
timerQueue:所有没有过期的任务会放在这个队列中。
-
taskQueue:所有过期的任务会放在该队列中,并且按过期时间排序,过期时间越小则排在越前面,并且越先执行。
当 Scheduler 开始调度任务执行时,首先会从 taskQueue 中获取过期任务并执行。任务按照优先级排序,优先级高的任务会先执行。一个任务执行完成后,会从 taskQueue 中移除。如果 taskQueue 中的所有任务都执行完了,Scheduler 会检查 timerQueue 中是否有过期任务。如果有过期任务,这些任务会被移到 taskQueue 中进行执行。
尽管如此,未过期的高优先级任务会优先于 timerQueue 中的低优先级任务执行。这意味着即使 timerQueue 中的某些任务尚未过期,只要有新的高优先级任务到来,它们会被立即插入 taskQueue 并优先执行。这样做的目的是确保高优先级任务能够及时响应用户操作,而低优先级任务在不影响应用性能的情况下稍后执行。
接下来我们从 unstable_scheduleCallback 函数开始看起,这个函数是调度的开始:
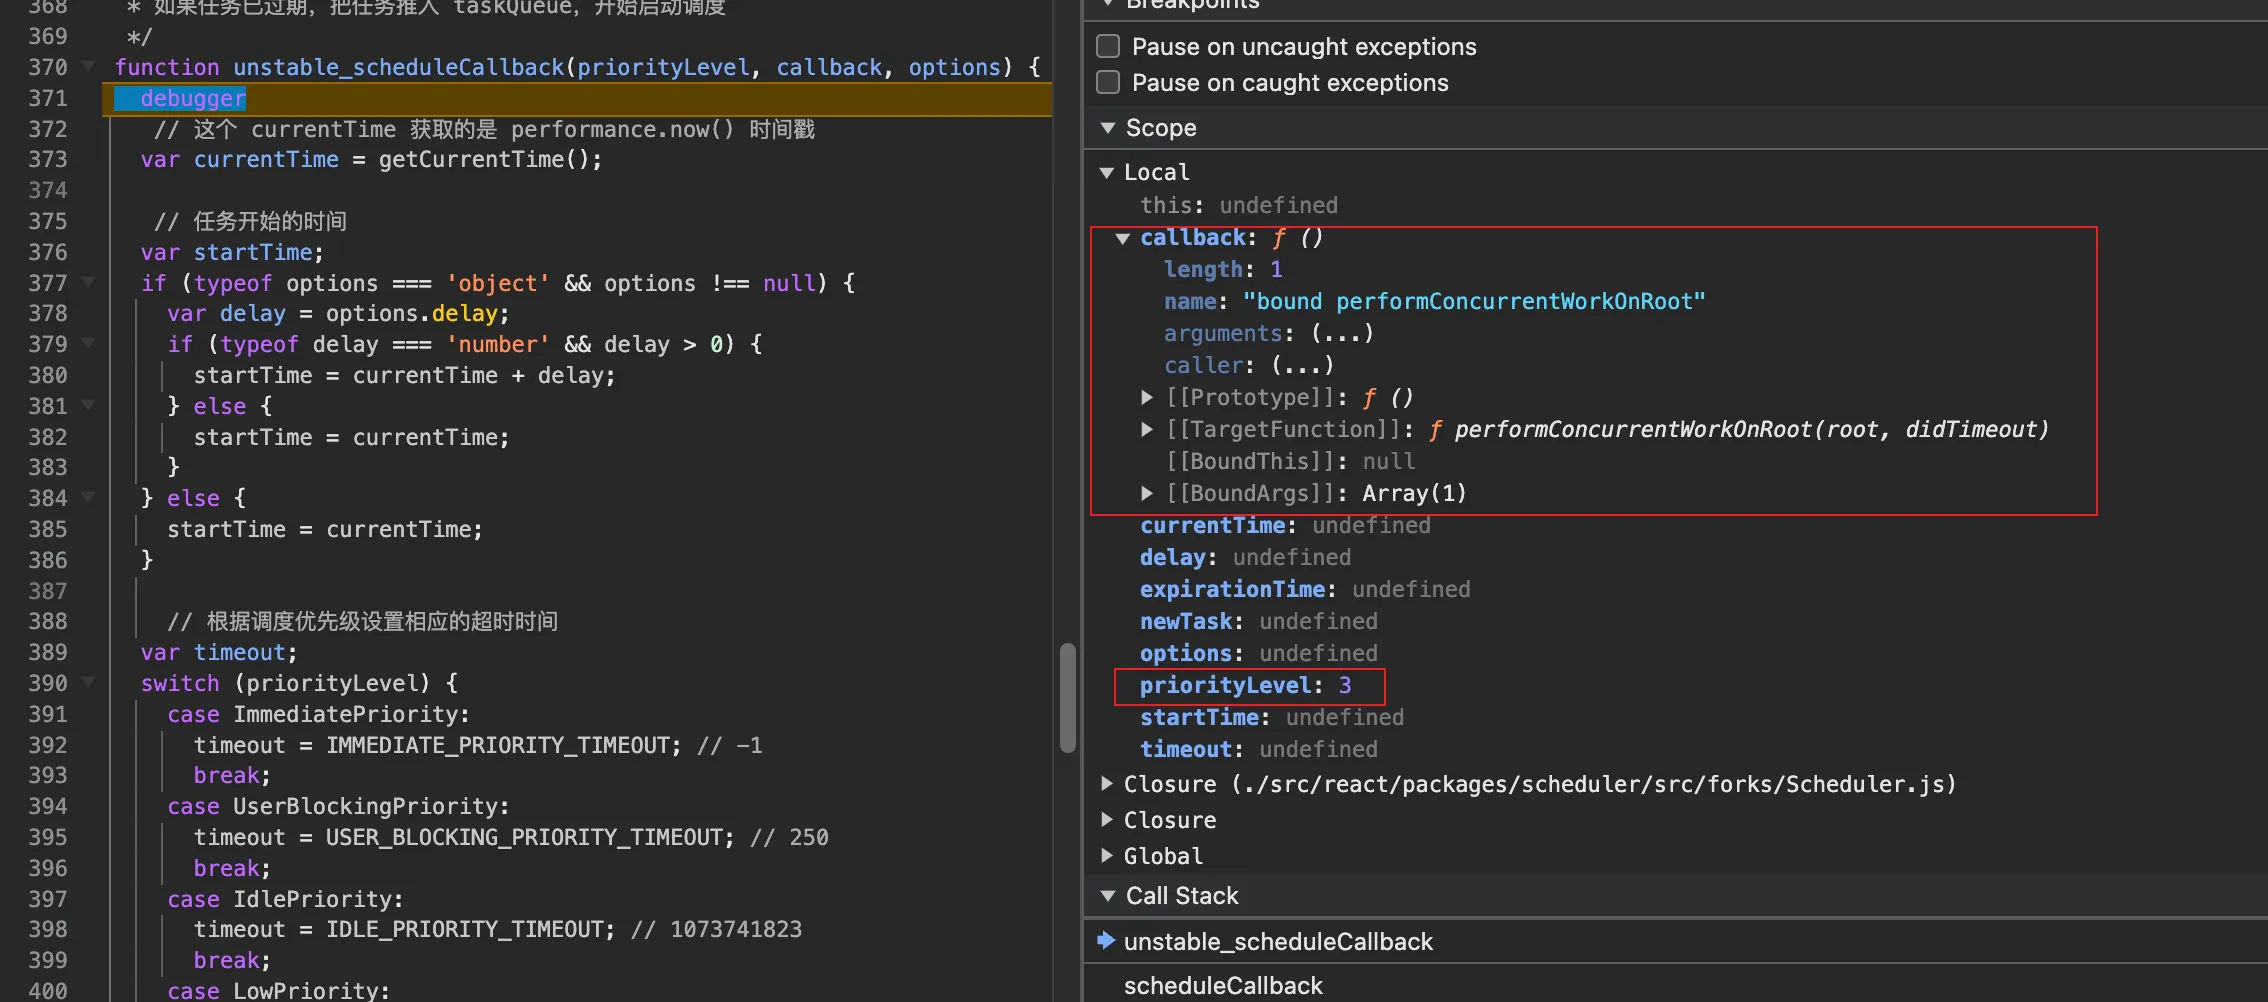
function unstable_scheduleCallback(priorityLevel, callback, options) {
  // 这个 currentTime 获取的是 performance.now() 时间戳
  var currentTime = getCurrentTime();

  // 任务开始的时间
  var startTime;
  if (typeof options === 'object' && options !== null) {
    var delay = options.delay;
    if (typeof delay === 'number' && delay > 0) {
      startTime = currentTime + delay;
    } else {
      startTime = currentTime;
    }
  } else {
    startTime = currentTime;
  }

  // 根据调度优先级设置相应的超时时间
  var timeout;
  switch (priorityLevel) {
    case ImmediatePriority:
      timeout = IMMEDIATE_PRIORITY_TIMEOUT; // -1
      break;
    case UserBlockingPriority:
      timeout = USER_BLOCKING_PRIORITY_TIMEOUT; // 250
      break;
    case IdlePriority:
      timeout = IDLE_PRIORITY_TIMEOUT; // 1073741823
      break;
    case LowPriority:
      timeout = LOW_PRIORITY_TIMEOUT; // 10000
      break;
    case NormalPriority:
    default:
      timeout = NORMAL_PRIORITY_TIMEOUT; // 5 000
      break;
  }

  /**
   * expirationTime 用于标识一个任务具体的过期时间
   * 当前任务在1分钟后过期跟10分钟后过期其实本质上都没有什么区别,因为都还没有过期
   * 但是关键在于10分钟后过期的情况,可以把当前任务稍微放一放,把资源先给其他任务执行
   */

  var expirationTime = startTime + timeout;

  // 属于 Scheduler 自己的 task
  var newTask = {
    id: taskIdCounter++, // 一个自增编号
    callback, // 这里的 callback 是 performConcurrentWorkOnRoot 函数
    priorityLevel, // 调度优先级
    startTime, // 任务开始时间
    expirationTime, // 任务过期时间
    sortIndex: -1,
  };
  if (enableProfiling) {
    newTask.isQueued = false;
  }

  // Scheduler调度任务时传入了 delay time,startTime 是大于 currentTime 的,
  // 表示这个任务将会延迟执行
  if (startTime > currentTime) {
    // 当前任务已超时,插入超时队列
    newTask.sortIndex = startTime;
    // 超时任务
    push(timerQueue, newTask);

    // peek 查看堆的顶点, 也就是优先级最高的`task`
    if (peek(taskQueue) === null && newTask === peek(timerQueue)) {
      // 这个任务是最早延迟执行的
      if (isHostTimeoutScheduled) {
        // Cancel an existing timeout.
        // 取消现有的定时器
        cancelHostTimeout();
      } else {
        isHostTimeoutScheduled = true;
      }
      // 安排一个定时器
      requestHostTimeout(handleTimeout, startTime - currentTime);
    }
  } else {
    // 任务未超时,插入调度任务队列
    newTask.sortIndex = expirationTime;
    // 调度中的队列
    push(taskQueue, newTask);
    if (enableProfiling) {
      markTaskStart(newTask, currentTime);
      newTask.isQueued = true;
    }
    // 符合更新调度执行的标志
    if (!isHostCallbackScheduled && !isPerformingWork) {
      isHostCallbackScheduled = true; // 是否有回调函数
      requestHostCallback(flushWork); // 调度任务
    }
  }

  return newTask;
}
unstable_scheduleCallback 这个函数会被传入三个参数,它们分别是 priorityLevel, callback, options。
- priorityLevel:优先级等级,它一共分为 6 个等级,,它的主要定义如下所示:
export type PriorityLevel = 0 | 1 | 2 | 3 | 4 | 5;

// 无优先级
export const NoPriority = 0;
// 立即执行优先级
export const ImmediatePriority = 1;
// 用户阻塞操作优先级 点击,输入
export const UserBlockingPriority = 2;
// 正常优先级
export const NormalPriority = 3;
// 低优先级
export const LowPriority = 4;
// 空闲优先级
export const IdlePriority = 5;-
callback:这就是我们前面使用 performConcurrentWorkOnRoot 传入的函数。
-
options:它是可选项,其中有一个 delay 属性,如果有 delay 属性,表示这是一个延时任务,要多少毫秒后再安排执行。
startTime
接下来我们逐步分享 unstable_scheduleCallback 函数逻辑中的 startTime:
// 这个 currentTime 获取的是 performance.now() 时间戳
var currentTime = getCurrentTime();

// 任务开始的时间
var startTime;
if (typeof options === 'object' && options !== null) {
  var delay = options.delay;
  if (typeof delay === 'number' && delay > 0) {
    startTime = currentTime + delay;
  } else {
    startTime = currentTime;
  }
} else {
  startTime = currentTime;
}
这段代码的主要作用是计算任务的实际开始时间。如果提供了一个有效的 options 对象,并且包含一个有效的延迟值(delay),那么任务的开始时间将会延迟执行。否则,任务会立即开始执行。
虽然名为开始时间,但实际创建了任务,React 也不会立刻就去执行,只能说,这是一个安排调度的时间,非要举例的话,这有点像你去银行,点击取号的那个时间。有了这个时间,可以方便的知道你已经在这家银行排队排了多久。
timeout
在 React 中,它的任务是可以被打断的,低优先级的任务可以被高优先级任务打断,但任务也不能一直被打断,所以要设置一个时间,超出某个时间就一定要执行。不同的优先级任务对应不同的超时时间,像普通优先级的任务就是 5000ms。
// 根据调度优先级设置相应的超时时间
var timeout;
switch (priorityLevel) {
  case ImmediatePriority:
    timeout = IMMEDIATE_PRIORITY_TIMEOUT; // -1
    break;
  case UserBlockingPriority:
    timeout = USER_BLOCKING_PRIORITY_TIMEOUT; // 250
    break;
  case IdlePriority:
    timeout = IDLE_PRIORITY_TIMEOUT; // 1073741823
    break;
  case LowPriority:
    timeout = LOW_PRIORITY_TIMEOUT; // 10000
    break;
  case NormalPriority:
  default:
    timeout = NORMAL_PRIORITY_TIMEOUT; // 5 000
    break;
}
这段代码的目的是根据任务的优先级设置一个相应的超时时间。不同的优先级对应不同的超时时间,确保高优先级任务能够及时响应,而低优先级任务在资源允许的情况下执行。
expirationTime
expirationTime 变量表示任务的过期时间。它是任务调度系统中的一个重要概念,用于决定任务何时必须开始执行,以防止任务被无限期地推迟。expirationTime 通过将任务的开始时间(startTime)与根据任务优先级确定的超时时间(timeout)相加来计算。
举个例子,假设当前时间 currentTime 是 1000 毫秒,任务的开始时间 startTime 也是 1000 毫秒,任务的优先级是 UserBlockingPriority,其超时时间是 250 毫秒:
var startTime = 1000;
var timeout = 250;
var expirationTime = startTime + timeout; // 1000 + 250 = 1250
在这种情况下,expirationTime 是 1250 毫秒,这意味着这个任务必须在 1250 毫秒之前开始执行。
newTask
newTask 是一个 Task 对象:
// 属于 Scheduler 自己的 task
var newTask = {
  id: taskIdCounter++, // 一个自增编号
  callback, // 这里的 callback 是 performConcurrentWorkOnRoot 函数
  priorityLevel, // 调度优先级
  startTime, // 任务开始时间
  expirationTime, // 任务过期时间
  sortIndex: -1,
};
if (enableProfiling) {
  newTask.isQueued = false;
}
这段代码创建并初始化了一个调度任务对象 newTask。id 是一个自增编号,用于唯一标识任务;callback 是任务执行时调用的函数,比如 performConcurrentWorkOnRoot;priorityLevel 表示任务的调度优先级;startTime 记录任务的开始时间,可能包含延迟;expirationTime 是任务的过期时间,由开始时间和超时时间相加得到;sortIndex 初始化为 -1,用于任务排序。
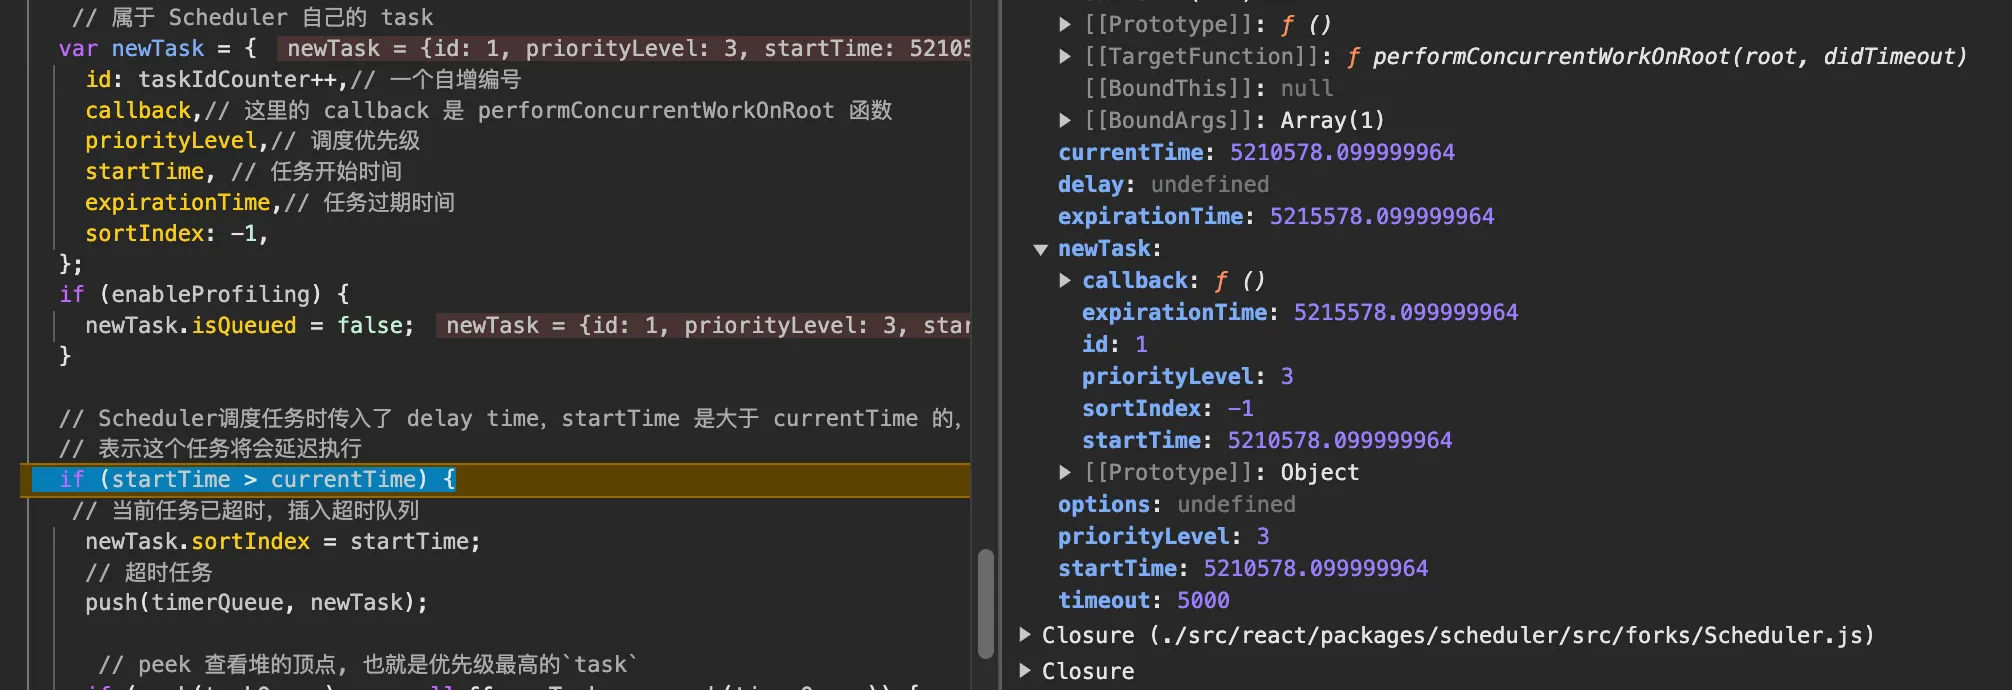
taskQueue 和 timerQueue
// 表示这个任务将会延迟执行
if (startTime > currentTime) {
  // 当前任务已超时,插入超时队列
  newTask.sortIndex = startTime;
  // 超时任务
  push(timerQueue, newTask);

  // peek 查看堆的顶点, 也就是优先级最高的`task`
  if (peek(taskQueue) === null && newTask === peek(timerQueue)) {
    // 这个任务是最早延迟执行的
    if (isHostTimeoutScheduled) {
      // Cancel an existing timeout.
      // 取消现有的定时器
      cancelHostTimeout();
    } else {
      isHostTimeoutScheduled = true;
    }
    // 安排一个定时器
    requestHostTimeout(handleTimeout, startTime - currentTime);
  }
} else {
  // 任务未超时,插入调度任务队列
  newTask.sortIndex = expirationTime;
  push(taskQueue, newTask);
  if (enableProfiling) {
    markTaskStart(newTask, currentTime);
    newTask.isQueued = true;
  }
  // 符合更新调度执行的标志
  if (!isHostCallbackScheduled && !isPerformingWork) {
    isHostCallbackScheduled = true; // 是否有回调函数
    requestHostCallback(flushWork); // 调度任务
  }
}

return newTask;
这段代码是 React Scheduler 用于管理和调度任务的关键部分。它根据任务的开始时间(startTime)和当前时间(currentTime)来决定任务是立即执行还是延迟执行,并相应地将任务插入不同的队列。
这里是最核心的逻辑,作用是将创建的任务分到不同的任务队列里,然后安排调度在前面我们已经描述过这两个数组的意思了,这里就不再做过多的描述了。
这段代码的核心作用是将新创建的任务根据其开始时间分配到不同的任务队列,并安排适当的调度。如果任务的开始时间大于当前时间,则将任务插入延迟任务队列 timerQueue,并根据需要设置或取消定时器,以便在任务到期时执行。如果任务的开始时间小于或等于当前时间,则将任务插入调度任务队列 taskQueue,并安排调度回调来执行任务。
假设你在开发一个具有复杂交互的应用,比如一个富文本编辑器。在编辑器中,有些任务需要立即响应用户操作(如字符输入),而有些任务可以稍后执行(如保存草稿)。
- 字符输入:用户在编辑器中输入字符,这种任务需要立即处理。Scheduler 会将这个任务的 startTime 设置为当前时间,将其插入 taskQueue 并立即安排执行。
保存草稿:每隔几秒钟自动保存草稿,这种任务可以稍后执行。Scheduler 会将这个任务的 startTime 设置为当前时间加上一定的延迟时间(如 5 秒),将其插入 timerQueue。当延迟时间过去后,任务会从 timerQueue 移到 taskQueue 并执行。
通过这种方式,Scheduler 能够有效地管理不同优先级的任务,确保关键任务得到及时响应,而不紧急的任务在适当的时间执行,提升应用的整体性能和用户体验。
requestHostCallback
接下来继续查看 requestHostCallback 方法:
let scheduledHostCallback = null;

function requestHostCallback(callback) {
  // 保存任务
  scheduledHostCallback = callback;
  if (!isMessageLoopRunning) {
    isMessageLoopRunning = true;
    // 标记 isMessageLoopRunning,标记消息轮询开始
    // 执行工作直到截止时间
    schedulePerformWorkUntilDeadline();
  }
}
设置全局变量 scheduledHostCallback 为传入的 callback 回调函数【flushWork】,然后判断消息循环是否在运行中,如果没有运行,则开启运行,然后调用 schedulePerformWorkUntilDeadline 方法,生成一个新的宏任务,异步执行 callback。
MessageChannel
在 React 中,schedule 调度执行采用的是 MessageChannel 生成的宏任务。
在讨论 React 的调度机制时,必须提到宏任务与微任务的关系。我们都知道,在执行完一个宏任务之后,浏览器会冲刷一次微任务队列。而微任务的一个特性是,在执行微任务的过程中,新创建的微任务会继续添加到微任务队列中。React 的时间切片功能通过将一个复杂任务分割成多个切片任务来提高性能,例如在创建 Fiber Tree 的过程中,会生成多个调度任务。
如果 React 将这些调度生成的任务使用微任务来执行,那么这些任务会持续在微任务队列中执行,不断冲刷微任务队列。这将导致长时间占用主线程,无法处理其他高优先级的任务,如用户交互和界面渲染,从而失去了调度的意义。
因此,React 选择使用宏任务来执行这些调度任务。通过将切片任务分割成多个宏任务,并降低它们的优先级,React 可以有效地释放主线程,让浏览器有机会处理渲染任务和用户交互。然后在有剩余时间时再继续执行其他的切片任务。这种机制确保了调度任务不会长时间阻塞主线程,从而提升了应用的响应性和用户体验。
时间切片就是为了避免一个复杂任务(task)长时间占用主线程,React 团队提出了 Fiber 架构和 Scheduler 任务调度。Scheduler 的主要功能是进行时间分片,将一个复杂任务分割成多个切片任务,每隔一段时间让出主线程,避免长时间占用主线程,从而让优先级更高的渲染任务有机会优先执行。这是一种典型的化整为零的思想,通过少量多批次的执行任务,提升应用的响应性和用户体验。
MessageChannel 和 setTimeout 的区别
MessageChannel 和 setTimeout 在任务调度中的区别主要在于精度和性能。MessageChannel 提供了更高的精度和低延迟,因为它不会受到定时器抖动的影响,任务会在事件循环的下一个空闲时间点立即执行,从而更快速地完成任务,避免了 setTimeout 的最小延迟限制。相比之下,setTimeout 存在最小延迟和定时器抖动问题,尤其在高负载情况下,其实际执行时间可能会偏离预期,影响任务的精确性和性能。此外,MessageChannel 与浏览器的事件循环紧密集成,避免了定时器堆积问题,确保任务调度更加高效和可靠。
定时器抖动(Timer Throttling or Timer Jitter)是指在使用定时器(如 setTimeout 和 setInterval)时,预期的回调执行时间与实际的执行时间之间出现波动或不一致的现象。这种抖动可能会导致回调函数的执行时间比预期的要早或要晚,从而影响应用的精确性和性能。
React 的时间切片功能通过将复杂任务分割成多个切片任务,每个切片任务通过 MessageChannel 调度,确保不会长时间占用主线程。这种方法让出主线程的时间片段,可以让浏览器处理其他高优先级的任务,如用户交互和界面渲染,从而提高应用的响应速度和用户体验。相比之下,setTimeout 存在最小延迟和定时器抖动问题,特别是在高负载情况下,预期的回调执行时间与实际的执行时间可能会出现波动,影响任务的精确性和性能。因此,MessageChannel 能更好地满足 React 的调度需求,提供更加高效和稳定的任务执行。
schedulePerformWorkUntilDeadline
接下来我们继续回到 schedulePerformWorkUntilDeadline 源码当中:
let schedulePerformWorkUntilDeadline;
if (typeof localSetImmediate === 'function') {
  schedulePerformWorkUntilDeadline = () => {
    localSetImmediate(performWorkUntilDeadline);
  };
} else if (typeof MessageChannel !== 'undefined') {
  // DOM and Worker environments.
  // We prefer MessageChannel because of the 4ms setTimeout clamping.
  const channel = new MessageChannel();
  const port = channel.port2;
  channel.port1.onmessage = performWorkUntilDeadline;

  schedulePerformWorkUntilDeadline = () => {
    port.postMessage(null);
  };
} else {
  // We should only fallback here in non-browser environments.
  schedulePerformWorkUntilDeadline = () => {
    localSetTimeout(performWorkUntilDeadline, 0);
  };
}
它首先检查 localSetImmediate 是否存在,它实际上是一个 setImmediate 是一个比 setTimeout 更快速的调度方法,如果存在(通常在某些特定环境下,如 Node.js 中),则使用它来调度任务 performWorkUntilDeadline 的执行。

在浏览器和 Web Worker 环境中,如果 MessageChannel 可用,则使用 MessageChannel 来调度任务。MessageChannel 提供了更高的精度和更低的延迟,避免了 setTimeout 的最小延迟(通常为 4 毫秒)的问题。这里创建了一个 MessageChannel,并将 performWorkUntilDeadline 设置为 port1 的消息处理程序。调用 port.postMessage(null) 来触发任务执行。
如下代码所示:
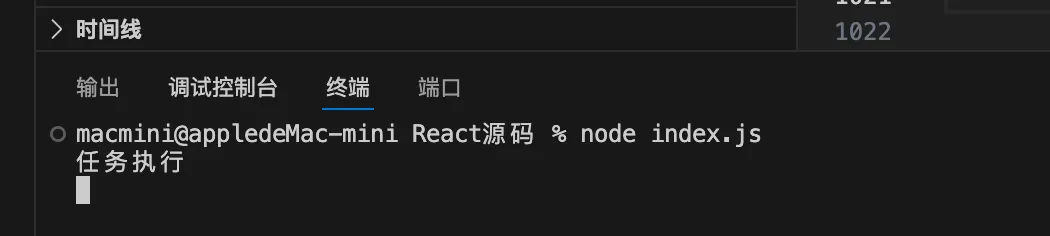
function createScheduler() {
  var channel = new MessageChannel();
  var port = channel.port2;

  channel.port1.onmessage = function () {
    // 执行调度任务
    performTask();
  };

  function scheduleTask() {
    // 向消息通道发送一条消息,触发任务执行
    port.postMessage(null);
  }

  function performTask() {
    // 这里执行具体的任务调度逻辑
    console.log('任务执行');
  }

  return {
    scheduleTask: scheduleTask,
  };
}

var scheduler = createScheduler();
scheduler.scheduleTask();
最终结果如下图所示:
performWorkUntilDeadline
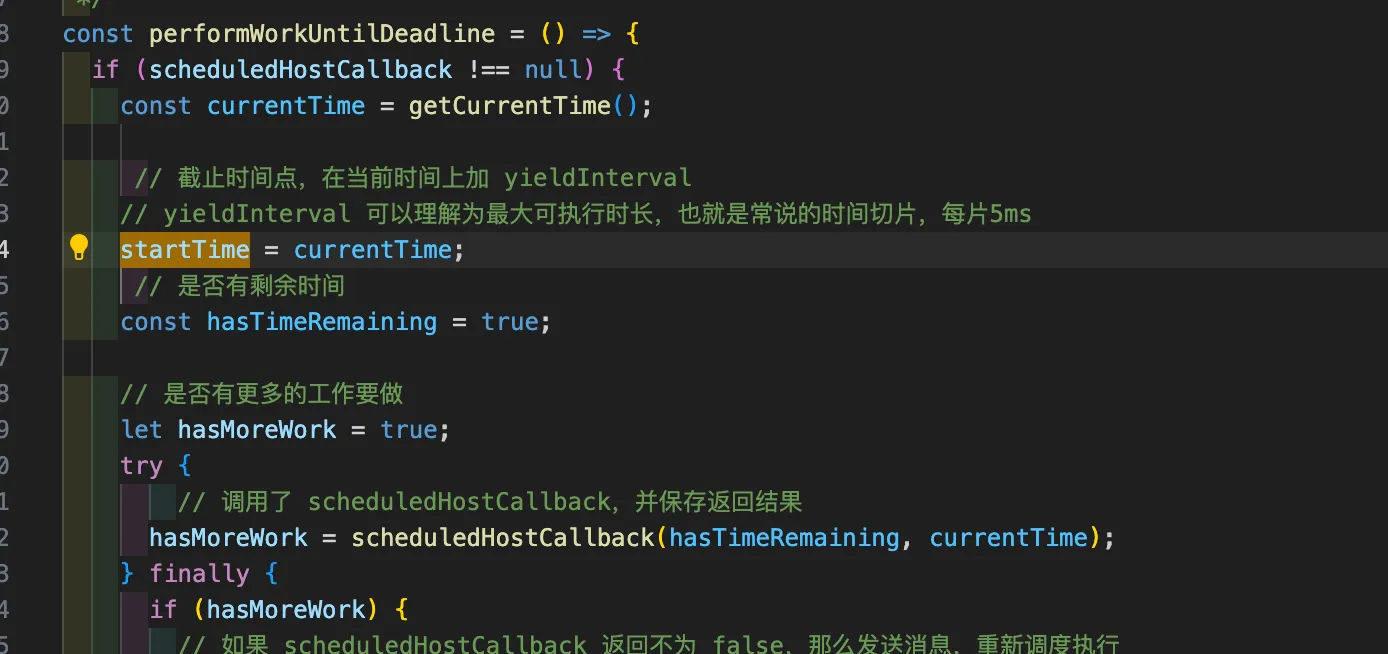
const performWorkUntilDeadline = () => {
  if (scheduledHostCallback !== null) {
    const currentTime = getCurrentTime();

    // 截止时间点,在当前时间上加 yieldInterval
    // yieldInterval 可以理解为最大可执行时长,也就是常说的时间切片,每片5ms
    startTime = currentTime;
    // 是否有剩余时间
    const hasTimeRemaining = true;

    // 是否有更多的工作要做
    let hasMoreWork = true;
    try {
      // 调用了 scheduledHostCallback,并保存返回结果
      hasMoreWork = scheduledHostCallback(hasTimeRemaining, currentTime);
    } finally {
      if (hasMoreWork) {
        // 如果 scheduledHostCallback 返回不为 false,那么发送消息,重新调度执行
        schedulePerformWorkUntilDeadline();
      } else {
        // 如果 scheduledHostCallback 返回 false,那么任务结束
        isMessageLoopRunning = false;
        scheduledHostCallback = null;
      }
    }
  } else {
    isMessageLoopRunning = false;
  }
  needsPaint = false;
};
performWorkUntilDeadline 内部调用的 scheduledHostCallback 函数,是在调用 requestHostCallback 时赋值为了 flushWork 函数。

flushWork
接下来我们看一下 flushWork 函数,它的作用就是批量处理任务:
function flushWork(hasTimeRemaining, initialTime) {
  if (enableProfiling) {
    markSchedulerUnsuspended(initialTime);
  }
  isHostCallbackScheduled = false;
  if (isHostTimeoutScheduled) {
    // 要开始执行了,不需要再等待 待调度任务 进入调度队列了,直接取消掉
    isHostTimeoutScheduled = false;
    cancelHostTimeout();
  }

  // 标记在执行中了
  isPerformingWork = true;
  // 保存当前的优先级
  const previousPriorityLevel = currentPriorityLevel;
  try {
    if (enableProfiling) {
      try {
        // 交给小弟 workLoop 去做任务中断与恢复了
        return workLoop(hasTimeRemaining, initialTime);
      } catch (error) {
        if (currentTask !== null) {
          const currentTime = getCurrentTime();
          markTaskErrored(currentTask, currentTime);
          currentTask.isQueued = false;
        }
        throw error;
      }
    } else {
      return workLoop(hasTimeRemaining, initialTime);
    }
  } finally {
    // 标记当前无任务执行
    currentTask = null;
    // 恢复优先级
    currentPriorityLevel = previousPriorityLevel;
    // 标记执行结束
    isPerformingWork = false;
    if (enableProfiling) {
      const currentTime = getCurrentTime();
      markSchedulerSuspended(currentTime);
    }
  }
}
这里也没啥,就是做了一些判断之后,最后的执行交给了 workLoop 函数来执行。也就是 performWorkUntilDeadline 中的 hasMoreWork 的值。从这里可以看出真正执行任务的地方就在 workLoop 函数中。
workLoop-任务的中断和恢复
在 React 中,对于认为的执行,有两个非常重要的特点,它们分别是 中断 和 恢复.
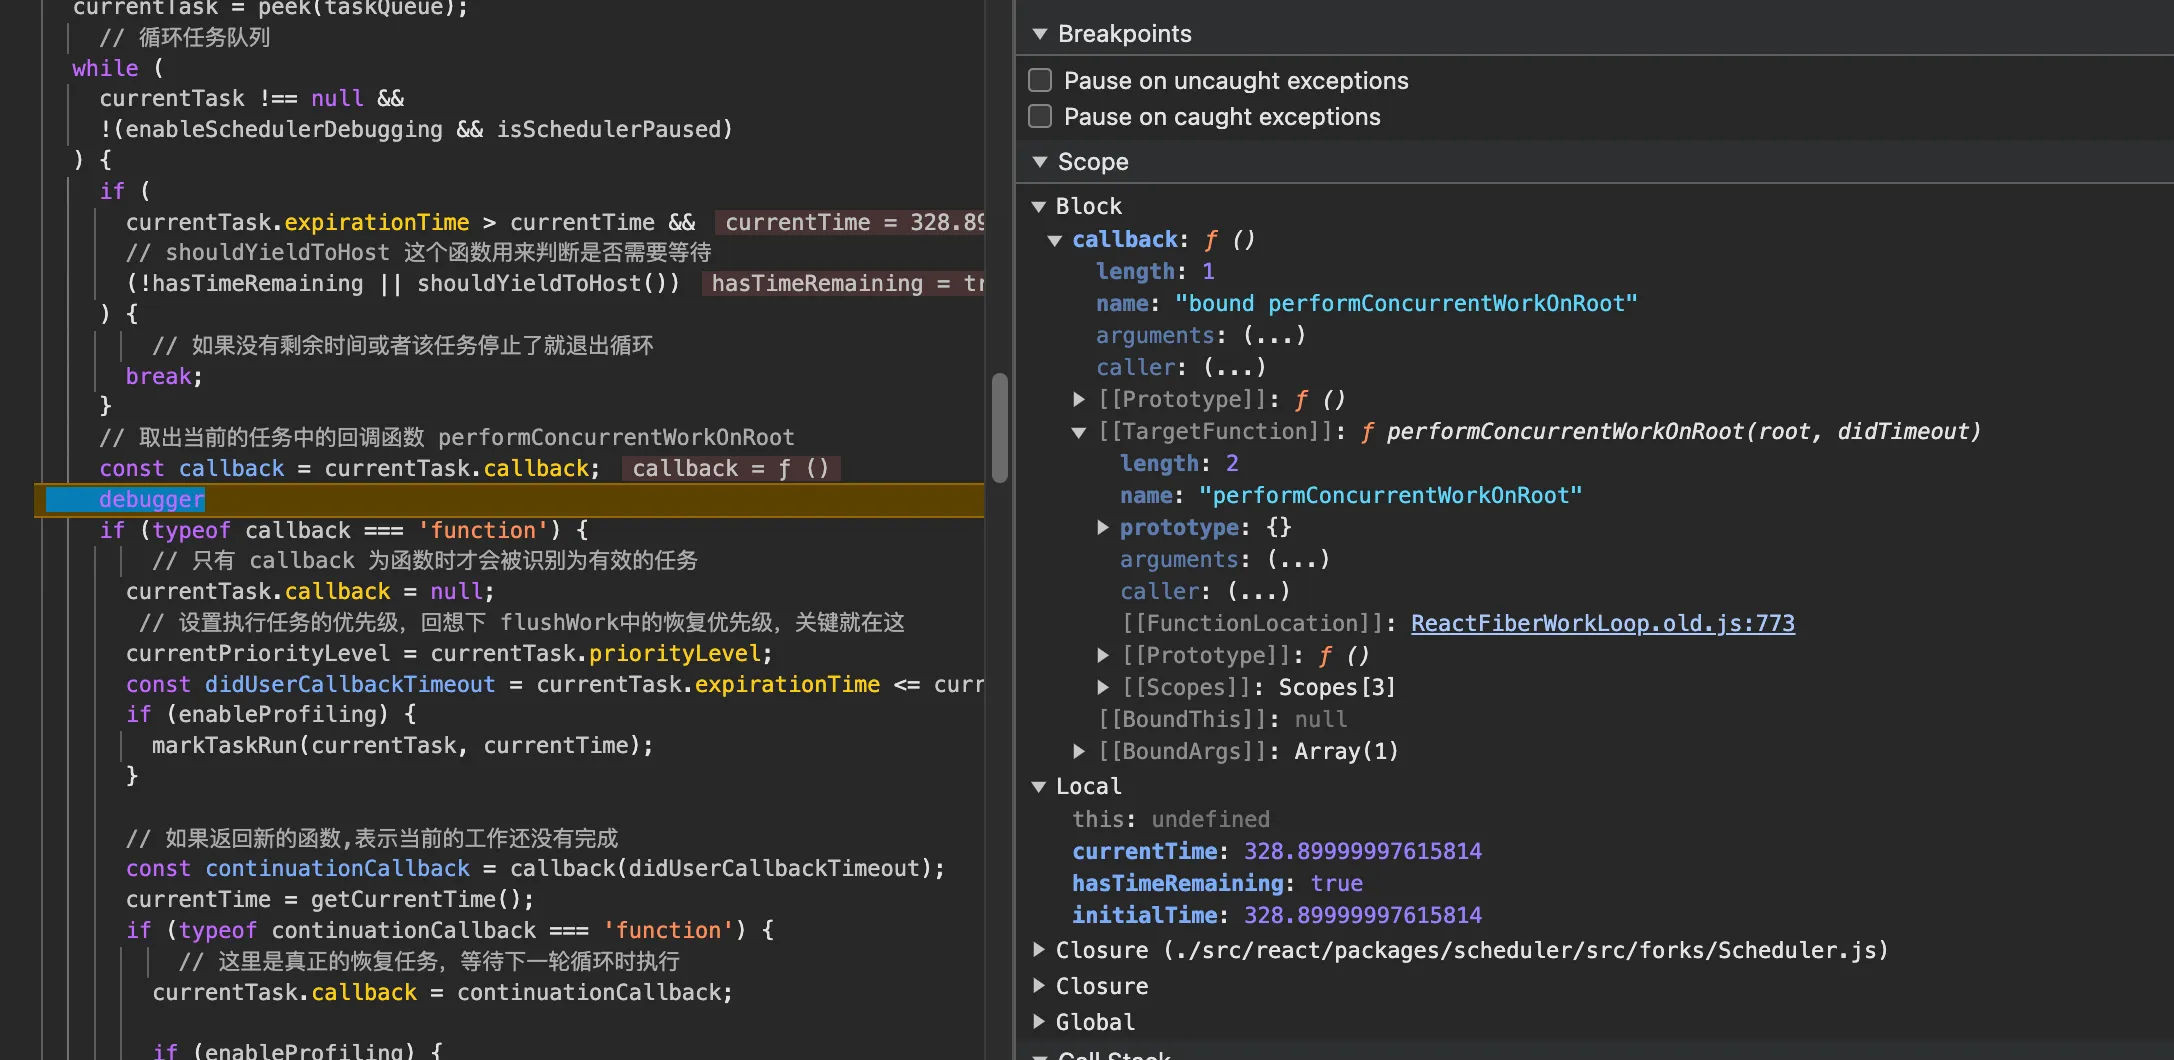
function workLoop(hasTimeRemaining, initialTime) {
  let currentTime = initialTime;
  // 先把过期的任务从 timerQueue 捞出来丢到 taskQueue 打包一块执行了
  advanceTimers(currentTime);
  // 获取优先级最高的任务
  currentTask = peek(taskQueue);
  // 循环任务队列
  while (currentTask !== null && !(enableSchedulerDebugging && isSchedulerPaused)) {
    if (
      currentTask.expirationTime > currentTime &&
      // shouldYieldToHost 这个函数用来判断是否需要等待
      (!hasTimeRemaining || shouldYieldToHost())
    ) {
      // 如果没有剩余时间或者该任务停止了就退出循环
      break;
    }
    // 取出当前的任务中的回调函数 performConcurrentWorkOnRoot
    const callback = currentTask.callback;
    if (typeof callback === 'function') {
      // 只有 callback 为函数时才会被识别为有效的任务
      currentTask.callback = null;
      // 设置执行任务的优先级,回想下 flushWork中的恢复优先级,关键就在这
      currentPriorityLevel = currentTask.priorityLevel;
      const didUserCallbackTimeout = currentTask.expirationTime <= currentTime;
      if (enableProfiling) {
        markTaskRun(currentTask, currentTime);
      }

      // 如果返回新的函数,表示当前的工作还没有完成
      const continuationCallback = callback(didUserCallbackTimeout);
      currentTime = getCurrentTime();
      if (typeof continuationCallback === 'function') {
        // 这里是真正的恢复任务,等待下一轮循环时执行
        currentTask.callback = continuationCallback;

        if (enableProfiling) {
          markTaskYield(currentTask, currentTime);
        }
      } else {
        if (enableProfiling) {
          markTaskCompleted(currentTask, currentTime);
          currentTask.isQueued = false;
        }
        if (currentTask === peek(taskQueue)) {
          // 不需要恢复任务了,标识当前任务已执行完,把任务从队列中移除掉
          pop(taskQueue);
        }
      }
      // 先把过期的任务从 timerQueue 捞出来丢到 taskQueue 打包一块执行了
      advanceTimers(currentTime);
    } else {
      pop(taskQueue);
    }
    // 获取最高优先级的任务(不一定是下一个任务)
    currentTask = peek(taskQueue);
  }
  // Return whether there's additional work
  if (currentTask !== null) {
    // 还有任务说明调度被暂停了,返回true标明需要恢复任务
    return true;
  } else {
    const firstTimer = peek(timerQueue);
    if (firstTimer !== null) {
      // 任务都跑完了
      requestHostTimeout(handleTimeout, firstTimer.startTime - currentTime);
    }
    // 返回false意味着当前任务都执行完了,不需要恢复
    return false;
  }
}
它实际上就是一个循环,从循环体中从 taskQueue 队列中取出当前优先级最高的任务 currentTask,并执行 currentTask 中的 callback 回调函数。
任务中断
在 while 循环中,我们可以看到这样的一段代码:
    if (
      currentTask.expirationTime > currentTime &&
      // shouldYieldToHost 这个函数用来判断是否需要等待
      (!hasTimeRemaining || shouldYieldToHost())
    ) {
      // 如果没有剩余时间或者该任务停止了就退出循环
      break;
    }
这段代码是中止当前任务的关键。它主要是这两个条件:
-
currentTask.expirationTime > currentTim:首先会判断当前任务的过期时间是否大于当前时间,大于则说明当前任务还没有过期不用现在执行,先将执行权让给已过期的任务。 -
!hasTimeRemaining:表示是否还有剩余时间,剩余时间不足则需要中断当前任务,让其他任务先执行,hasTimeRemaining 一直为 true,我们可以暂时忽略这个条件。
shouldYieldToHost 函数如下代码所示:
function shouldYieldToHost() {
  const timeElapsed = getCurrentTime() - startTime;
  if (timeElapsed < frameInterval) {
    return false;
  }

  if (enableIsInputPending) {
    if (needsPaint) {
      return true;
    }
    if (timeElapsed < continuousInputInterval) {
      if (isInputPending !== null) {
        return isInputPending();
      }
    } else if (timeElapsed < maxInterval) {
      if (isInputPending !== null) {
        return isInputPending(continuousOptions);
      }
    } else {
      return true;
    }
  }
  return true;
}
首先检查当前任务的使用时间是否小于帧间隔时间 (5ms),小于则返回 false 表示无需中断,startTime 是在调用 performWorkUntilDeadline 时赋的值,也就是任务开始调度的时候的开始时间:
如果大于表示当前任务的执行时间超过了一帧渲染的时间 5ms,会让用户操作造成卡顿,则返回 true 表示需要中断。
对于 isInputPending 函数,它是这样定义的:
const isInputPending =
  typeof navigator !== 'undefined' &&
  navigator.scheduling !== undefined &&
  navigator.scheduling.isInputPending !== undefined
    ? navigator.scheduling.isInputPending.bind(navigator.scheduling)
    : null;
检查当前环境是否支持 navigator.scheduling.isInputPending 方法,并根据支持情况创建一个函数引用 isInputPending,用于检测是否有用户输入正在等待处理。例如:鼠标点击,键盘输入等,如果有用户输入测返回 true,没有则返回 false。
任务执行
// 取出当前的任务中的回调函数 performConcurrentWorkOnRoot
const callback = currentTask.callback;

if (typeof callback === 'function') {
  // 只有 callback 为函数时才会被识别为有效的任务
  currentTask.callback = null;
  // 设置执行任务的优先级,回想下 flushWork中的恢复优先级,关键就在这
  currentPriorityLevel = currentTask.priorityLevel;
  const didUserCallbackTimeout = currentTask.expirationTime <= currentTime;
  if (enableProfiling) {
    markTaskRun(currentTask, currentTime);
  }

  // 如果返回新的函数,表示当前的工作还没有完成
  const continuationCallback = callback(didUserCallbackTimeout);
  currentTime = getCurrentTime();
  if (typeof continuationCallback === 'function') {
    // 这里是真正的恢复任务,等待下一轮循环时执行
    currentTask.callback = continuationCallback;

    if (enableProfiling) {
      markTaskYield(currentTask, currentTime);
    }
  } else {
    if (enableProfiling) {
      markTaskCompleted(currentTask, currentTime);
      currentTask.isQueued = false;
    }
    if (currentTask === peek(taskQueue)) {
      // 不需要恢复任务了,标识当前任务已执行完,把任务从队列中移除掉
      pop(taskQueue);
    }
  }
  // 先把过期的任务从 timerQueue 捞出来丢到 taskQueue 打包一块执行了
  advanceTimers(currentTime);
} else {
  pop(taskQueue);
}
在前面的内容中我们就已经讲到了,它首先是从 currentTask 当前任务中获取任务执行函数 callback,而 Callback 实际上就是调用 scheduleCallback 时传入的 performConcurrentWorkOnRoot 函数:
function ensureRootIsScheduled(root: FiberRoot, currentTime: number) {
  newCallbackNode = scheduleCallback(
    schedulerPriorityLevel,
    performConcurrentWorkOnRoot.bind(null, root),
  );

  root.callbackPriority = newCallbackPriority;
  root.callbackNode = newCallbackNode;
}
首先从当前任务中提取回调函数 callback,如果 callback 不是有效的函数,则将该任务从 taskQueue 中移除。
如果 callback 是函数,则会执行该回调,并传入当前任务的到期状态 didUserCallbackTimeout。回调函数执行后返回一个 continuationCallback,表示当前任务的执行状态。
当 continuationCallback 为 null 时,任务执行完成并从队列中移除;如果返回的是另一个函数,则说明任务被中断并需要在后续的调度中继续执行,此时会更新当前任务的回调函数为 continuationCallback,以便在下一轮调度时继续执行任务。
最后,调用 advanceTimers,将已过期的任务从 timerQueue 移到 taskQueue,以便与其他任务一起执行。
执行状态
那么执行状态它是如何判断的呢,首先我们再来查看一下调用 scheduleCallback 的函数 ensureRootIsScheduled 中的源码:
function ensureRootIsScheduled(root: FiberRoot, currentTime: number) {
  newCallbackNode = scheduleCallback(
    schedulerPriorityLevel,
    performConcurrentWorkOnRoot.bind(null, root)
  );

  root.callbackPriority = newCallbackPriority;
  root.callbackNode = newCallbackNode;
}
可以看到,调用 scheduleCallback 函数后会将任务对象 newTask 返回回来,并挂载到 root 的 callbackNode 属性上。也就是说 callback 属性对应的内容为 performConcurrentWorkOnRoot 方法,
function performConcurrentWorkOnRoot(root, didTimeout) {

  if (enableProfilerTimer && enableProfilerNestedUpdatePhase) {
    resetNestedUpdateFlag();
  }

  // 当前是React事件,重置记录事件的时间
  currentEventTime = NoTimestamp;
  currentEventTransitionLane = NoLanes;

  if ((executionContext & (RenderContext | CommitContext)) !== NoContext) {
    throw new Error('Should not already be working.');
  }

  // 处理effect
  const originalCallbackNode = root.callbackNode;
  const didFlushPassiveEffects = flushPassiveEffects();
  if (didFlushPassiveEffects) {
    if (root.callbackNode !== originalCallbackNode) {

      return null;
    }
  }

  // 获取车道
  let lanes = getNextLanes(
    root,
    root === workInProgressRoot ? workInProgressRootRenderLanes : NoLanes,
  );
  // 如果 nextLanes 为 NoLanes,就证明所有任务都执行完毕了
  if (lanes === NoLanes) {
    // Defensive coding. This is never expected to happen.
    return null;
  }

  // 是否开启时间切片,如果返回的 false 则同步渲染
  const shouldTimeSlice =
    !includesBlockingLane(root, lanes) &&
    !includesExpiredLane(root, lanes) &&
    (disableSchedulerTimeoutInWorkLoop || !didTimeout);

  // 如果 CPU 时间 bound 触发,或者我们在同步更新模式中,则禁止时间切片,并使用同步渲染
  let exitStatus = shouldTimeSlice
    ? renderRootConcurrent(root, lanes)
    : renderRootSync(root, lanes);

  // 协调结束
  if (exitStatus !== RootInProgress) {
    // 出现异常
    if (exitStatus === RootErrored) {
      const errorRetryLanes = getLanesToRetrySynchronouslyOnError(root);
      if (errorRetryLanes !== NoLanes) {
        lanes = errorRetryLanes;
        exitStatus = recoverFromConcurrentError(root, errorRetryLanes);
      }
    }
    // 出现异常
    if (exitStatus === RootFatalErrored) {
      const fatalError = workInProgressRootFatalError;
      // 保存任务状态,例如 fiber 树的构建
      prepareFreshStack(root, NoLanes);
      markRootSuspended(root, lanes);
      ensureRootIsScheduled(root, now());
      throw fatalError;
    }

    // suspense 挂起
    if (exitStatus === RootDidNotComplete) {
      markRootSuspended(root, lanes);
    } else {
      // 渲染完成
      const renderWasConcurrent = !includesBlockingLane(root, lanes);
      const finishedWork: Fiber = (root.current.alternate: any);
      if (
        renderWasConcurrent &&
        !isRenderConsistentWithExternalStores(finishedWork)
      ) {
        exitStatus = renderRootSync(root, lanes);
        // We need to check again if something threw
        if (exitStatus === RootErrored) {
          const errorRetryLanes = getLanesToRetrySynchronouslyOnError(root);
          if (errorRetryLanes !== NoLanes) {
            lanes = errorRetryLanes;
            exitStatus = recoverFromConcurrentError(root, errorRetryLanes);
          }
        }
        if (exitStatus === RootFatalErrored) {
          const fatalError = workInProgressRootFatalError;
          prepareFreshStack(root, NoLanes);
          markRootSuspended(root, lanes);
          ensureRootIsScheduled(root, now());
          throw fatalError;
        }
      }

      root.finishedWork = finishedWork;
      root.finishedLanes = lanes;
      finishConcurrentRender(root, exitStatus, lanes);
    }
  }

  // 检查是否还有任务需要执行
  ensureRootIsScheduled(root, now());
  // 判断开始缓存起来的值是否一样
  if (root.callbackNode === originalCallbackNode) {
    // 渲染被阻断,返回一个新的performConcurrentWorkOnRoot函数,等待下一次调用
    return performConcurrentWorkOnRoot.bind(null, root);
  }
  return null;
}
这段代码的主要主要执行流程如下步骤所示:
-
处理副作用(effect):flushPassiveEffects() 用于处理所有的被动副作用(如 useEffect 的回调),因为这些副作用可能会影响当前的渲染任务。如果在处理副作用的过程中,当前任务被取消(例如,由于新的更新或渲染请求),函数将返回 null,并停止当前的任务执行。
-
获取下一批要处理的任务(车道):调用 getNextLanes() 来确定哪些任务(或更新)需要在当前渲染中处理。如果没有任何任务需要处理(即所有任务已完成),则函数直接返回 null,表示不再需要执行任何操作。
-
决定使用时间切片还是同步渲染:根据当前任务的优先级和状态,决定是否使用时间切片。如果任务是高优先级或已过期(需要立即执行),则使用同步渲染;否则,使用并发渲染(时间切片)。
-
执行渲染任务:根据前一步的决定,调用 renderRootConcurrent() 或 renderRootSync() 执行渲染任务。并发渲染允许任务被分成多个小的时间片段执行,而同步渲染会一次性完成整个渲染过程。exitStatus 保存了渲染的状态,可能的状态包括渲染进行中、渲染出错、渲染挂起或渲染完成。
-
处理渲染完成:如果渲染成功完成,或遇到 suspense 组件挂起的情况,函数会记录渲染结果(如 finishedWork),并调用 finishConcurrentRender() 完成渲染过程。
-
检查是否有更多的任务需要执行:调用 ensureRootIsScheduled() 来检查是否有其他任务需要执行,如果有,则继续调度。
-
返回新的调度函数或结束任务:如果当前任务被阻断并且需要在下一次继续执行,则返回
performConcurrentWorkOnRoot.bind(null, root);,以便稍后再次调用。如果任务完成或取消,则返回 null。
在 React 的整个构建流程中,大致可以划分为两个阶段:
-
render 阶段,在这个阶段任务是可以被中断的
-
commit 阶段,这个阶段任务是无法被中断的
而 commit 阶段的入口是 commitRootImpl 函数,我们可以看到 root.callbackNode 在 commit 阶段被置为了 null:
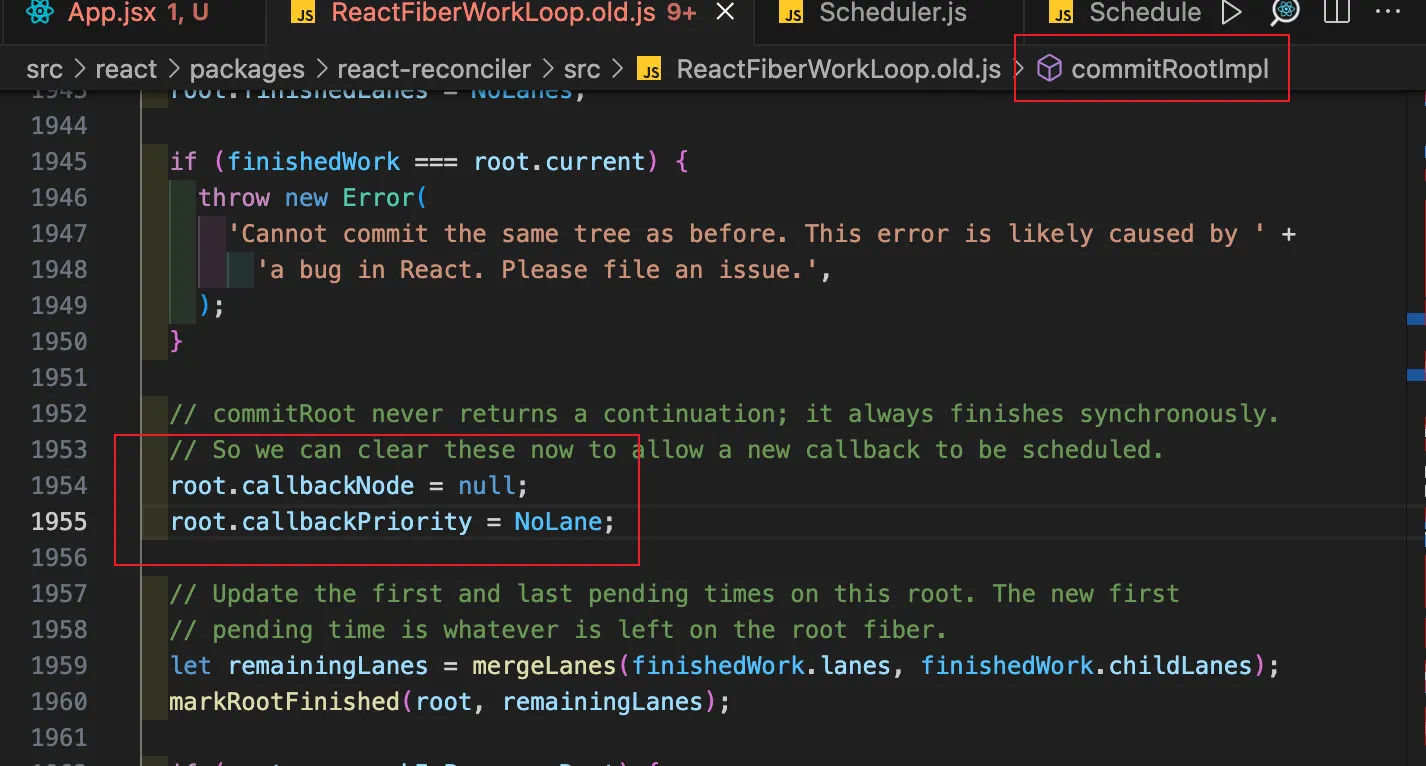
如果当任务执行到 commit 阶段,那么任务肯定已经完成了,root.callbackNode 会被置为 null。
我们再来看一下最后的一段代码:
if (root.callbackNode === originalCallbackNode) {
  // 渲染被阻断,返回一个新的performConcurrentWorkOnRoot函数,等待下一次调用
  return performConcurrentWorkOnRoot.bind(null, root);
}
return null;
如果 root.callbackNode 与 originalCallbackNode 相同,表示当前渲染任务在本次执行过程中没有被新的更新打断,仍然是有效的任务。由于 React 的并发渲染可能在中途被打断(例如时间切片机制),因此需要将未完成的任务继续排队,以便在下一次调度循环中继续执行。代码通过 performConcurrentWorkOnRoot.bind(null, root) 创建并返回一个新的绑定函数,这个函数将在未来某个时刻被调用,继续执行 performConcurrentWorkOnRoot,处理与 root 相关的渲染任务。如果这个函数返回 null,表示 render 阶段已经完成,或者任务已经进入 commit 阶段,因而不需要再继续调度。
如果 root.callbackNode 与 originalCallbackNode 不同,说明当前渲染任务在执行过程中被新的更新任务打断并替换。这通常意味着有更高优先级的任务需要处理。在这种情况下,当前任务已经不再是最新的,因此不会返回新的调度函数,而是直接返回 null,表示不再需要继续执行当前的任务,并且新的任务可能已经开始了一个新的 render 阶段,或者已进入 commit 阶段。
let exitStatus = shouldTimeSlice ? renderRootConcurrent(root, lanes) : renderRootSync(root, lanes);在这个判断中,也就是如果不满足时间切片的条件,就会调用 renderRootSync 方法,使用同步渲染创建 FiberTree。否则使用并发的方式来创建。
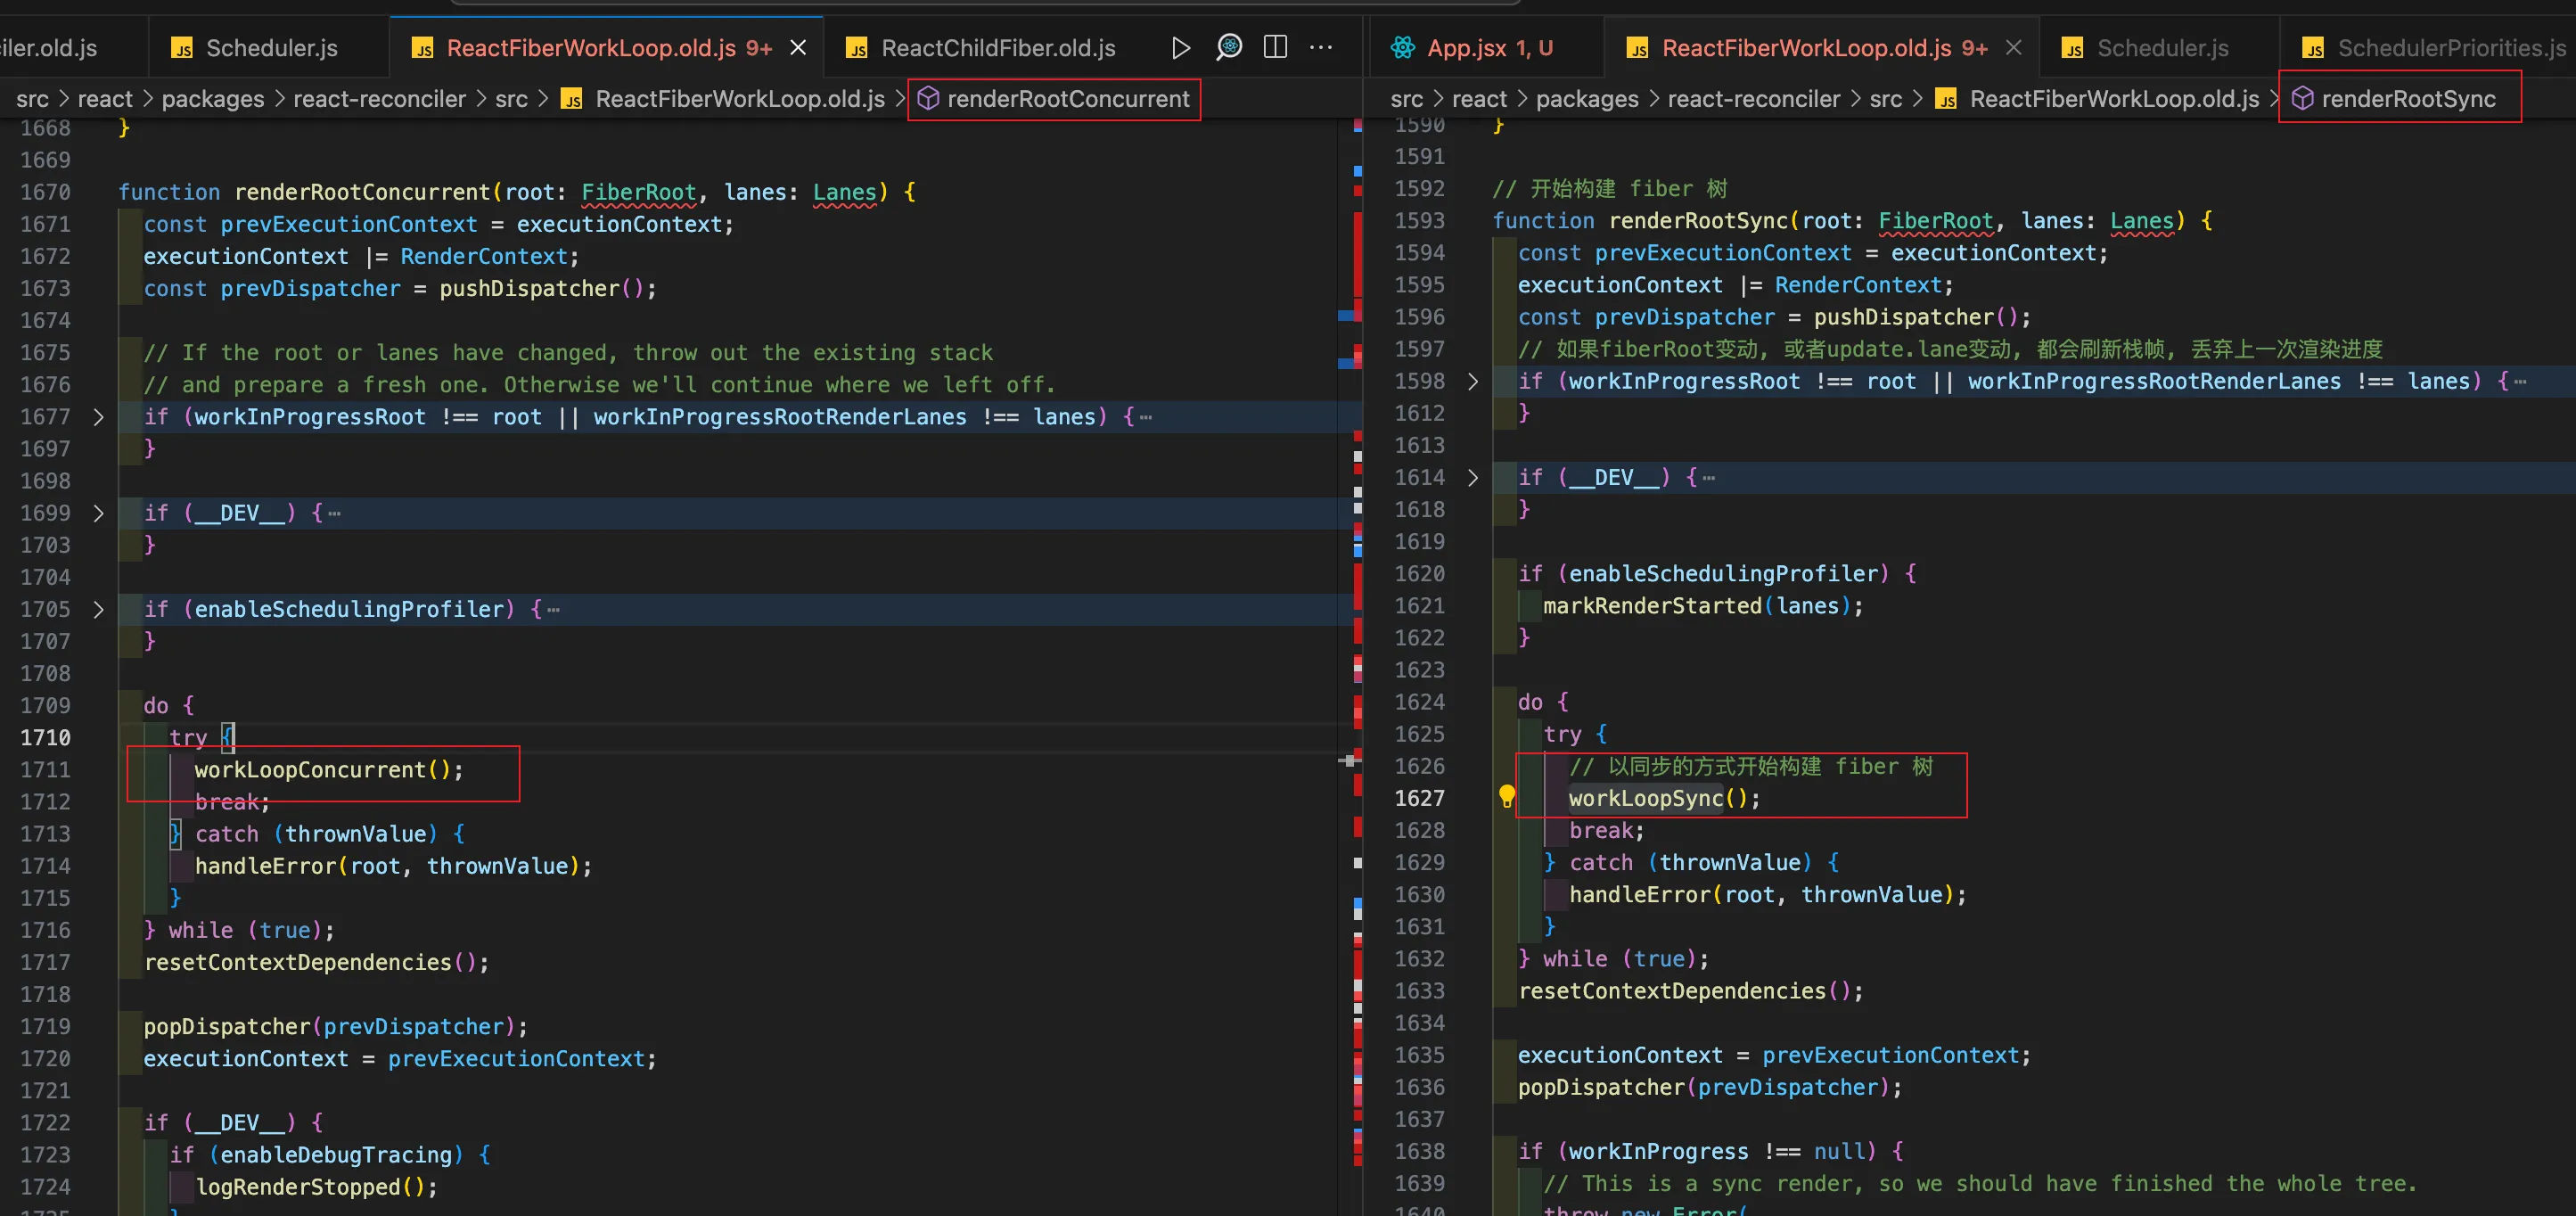
你会发现它们的核心都是调用一个前缀名为 workLoop 的函数,但是它们基本是相同的,就是多了一个不同的判断而已:
/**
 * 如果有下一个要构建的 fiber 并且时间片没有过期
 */
function workLoopConcurrent() {
  while (workInProgress !== null && !shouldYield()) {
    performUnitOfWork(workInProgress);
  }
}

function workLoopSync() {
  while (workInProgress !== null) {
    performUnitOfWork(workInProgress);
  }
}
在这个函数里,你会看到它实际上再调用 beginWork 函数来创建 fiber 树:
function performUnitOfWork(unitOfWork: Fiber): void {
  const current = unitOfWork.alternate;

  setCurrentDebugFiberInDEV(unitOfWork);

  let next;
  if (enableProfilerTimer && (unitOfWork.mode & ProfileMode) !== NoMode) {
    startProfilerTimer(unitOfWork);
    next = beginWork(current, unitOfWork, subtreeRenderLanes);
    stopProfilerTimerIfRunningAndRecordDelta(unitOfWork, true);
  } else {
    next = beginWork(current, unitOfWork, subtreeRenderLanes);
  }

  resetCurrentDebugFiberInDEV();
  unitOfWork.memoizedProps = unitOfWork.pendingProps;
  if (next === null) {
    // 如果没有子节点,表示当前的 fiber 已经完成了
    completeUnitOfWork(unitOfWork);
  } else {
    // 如果有子节点,就让子节点称为下一个工作单元
    workInProgress = next;
  }

  ReactCurrentOwner.current = null;
}
这个时候我们再回到 performConcurrentWorkOnRoot 函数中,它还有一个状态,即 fiberTree 已经创建完成,将创建完成的 FiberTree 取出,存储到应用根节点 root 上,方法后续的 dom 渲染工作。最后调用 finishConcurrentRender 方法:
const renderWasConcurrent = !includesBlockingLane(root, lanes);
const finishedWork: Fiber = (root.current.alternate: any);
if (
  renderWasConcurrent &&
  !isRenderConsistentWithExternalStores(finishedWork)
) {
  exitStatus = renderRootSync(root, lanes);
  // We need to check again if something threw
  if (exitStatus === RootErrored) {
    const errorRetryLanes = getLanesToRetrySynchronouslyOnError(root);
    if (errorRetryLanes !== NoLanes) {
      lanes = errorRetryLanes;
      exitStatus = recoverFromConcurrentError(root, errorRetryLanes);
    }
  }
  if (exitStatus === RootFatalErrored) {
    const fatalError = workInProgressRootFatalError;
    prepareFreshStack(root, NoLanes);
    markRootSuspended(root, lanes);
    ensureRootIsScheduled(root, now());
    throw fatalError;
  }
}

root.finishedWork = finishedWork;
root.finishedLanes = lanes;
finishConcurrentRender(root, exitStatus, lanes);
该方法主要是调用 commitRoot 函数开启 commit 阶段:
function finishConcurrentRender(root, exitStatus, lanes) {
  switch (exitStatus) {
    case RootInProgress:
    case RootFatalErrored: {
      throw new Error('Root did not complete. This is a bug in React.');
    }
    case RootErrored: {
      commitRoot(root, workInProgressRootRecoverableErrors, workInProgressTransitions);
      break;
    }
    case RootCompleted: {
      commitRoot(root, workInProgressRootRecoverableErrors, workInProgressTransitions);
      break;
    }
    default: {
      throw new Error('Unknown root exit status.');
    }
  }
}
也就是说当它执行到这里的时候就开始 commit 阶段的执行。
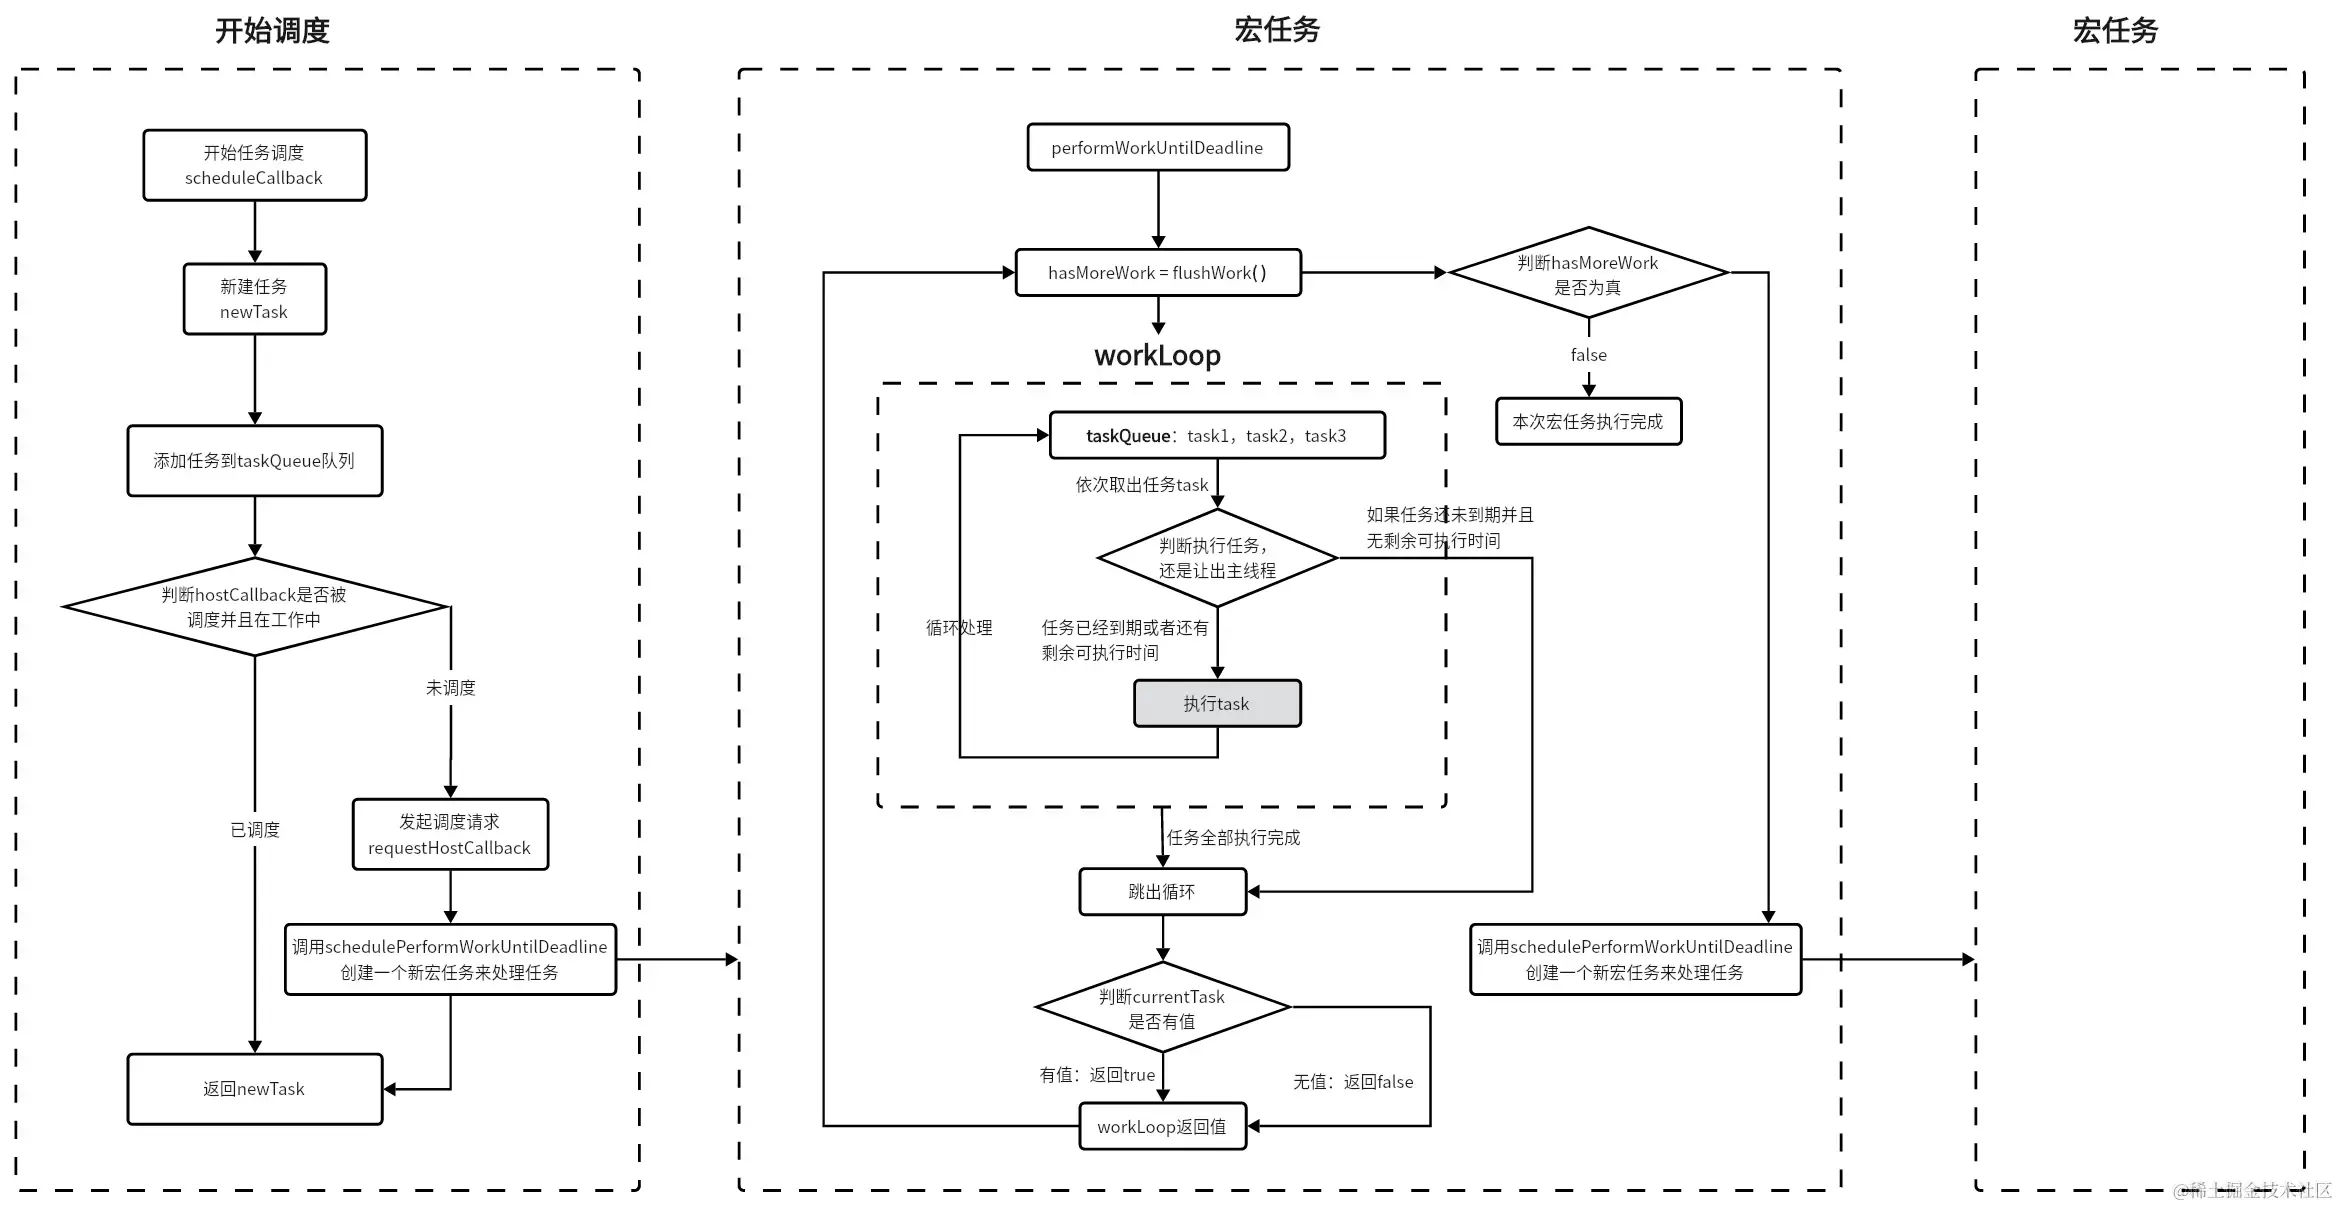
一个基本的 Schedule 调度主要有如下步骤的执行流程:
参考资料
总结
Schedule 通过任务的优先级设置 expirationTime 过期时间,然后通过判断任务是否过期,分别将任务存放到 timerQueue 和 taskQueue 中。过期的任务都会从 timerQueue 中取出放到 taskQueue 中执行。
Scheduler 在不同环境中创建调度者的方式不同:
-
服务端使用 setImmediate 来创建调度者
-
浏览器端使用 MessageChannel 来创建调度者
-
在以上方案都不能实现的时候,则降级使用 setTimeout 来实现创建调度者
在服务端使用 MessageChannel 会阻止 node 进程的关闭,而是用 setImmediate 不会。
不直接使用 setTimeout 来实现创建调度者的原因是因为 setTimeout 如果嵌套的层级超过了 5 层,并且 timeout 小于 4ms,则设置 timeout 为 4ms。而一帧的渲染时间为 16.6ms,使用 setTimeout 默认就会使用 4ms,这样的开销对于浏览器的是无法接受的。
React 的 Schedule 调度机制通过 scheduler 和 Fiber 架构实现高效的任务管理,分为 render 和 commit 两个阶段。在 render 阶段,React 调度更新任务并构建新的 FiberTree,这一阶段是可中断的,允许高优先级任务优先执行,从而提高应用的响应性。任务根据优先级被分配到不同的队列,并在系统空闲时执行。commit 阶段将 FiberTree 的变更同步到 DOM 中,这个阶段是同步且不可中断的,确保界面更新的一致性。通过时间切片和并发渲染,React 能在确保流畅用户体验的同时,优化性能并减少任务对主线程的长时间占用。
最后分享两个我的两个开源项目,它们分别是:
这两个项目都会一直维护的,如果你想参与或者交流学习,可以加我微信 yunmz777 如果你也喜欢,欢迎 star 🚗🚗🚗